For developers new to Git, the sequence of commands git add, git commit, git push can seem like a magical ritual. You type the commands and somehow, your source code is saved and shared. But have you ever wondered: What actually happens to a file when you run those commands? Why do you need git add before commit?

Understanding the life cycle of a file is the key to demystifying these questions and turning Git from a daunting tool into a powerful and reliable ally. Let's explore the journey of a file, from its creation in your project folder to its permanent storage in version history.
The Core Foundation: 3 States & 4 Areas
Before following a file's journey, we need to get familiar with the "map." In the world of Git, every file you work with exists in one of three core states, and they move between four distinct areas of operation.
The Three Core States
- Modified: The file has been changed (you added code, fixed a bug, deleted a line, etc.) but hasn't been officially marked to be saved in history.
- Staged: You've carefully selected and marked the current version of the file, ready to be written into the "history book" in the next commit. This is a crucial intermediate state.
- Committed: The file's data has been safely and permanently stored in your local repository. It has become part of the project's history.
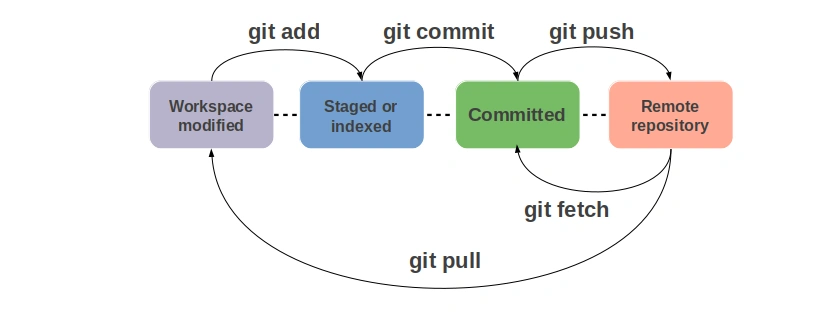
The Four Areas of Operation
- Working Directory: This is your project folder on your computer. It's where you actually create, edit, and delete files. This is the "stage" where all changes happen.
- Staging Area: Think of this as a "waiting area" or a "shopping cart." Before you "checkout" (commit), you must put the items (changes) you want to buy into the cart. The Staging Area lets you carefully choose which changes will be included in the next commit. Technically, this is a special file in your
.gitfolder, often called the "index." - Local Repository: This is the "history book" or "storage" of the project, located in the
.gitsubfolder. It contains all the commits, i.e., all saved versions of the project. Everything here is safe on your machine. - Remote Repository: A copy of your repository, usually hosted on a remote server (like GitHub, GitLab). This is where you share and synchronize your work with teammates.
The Journey of a File
Now, let's follow a file named feature.js throughout its life cycle.
Stage 1: Birth - Untracked
You've just created a new file feature.js in the Working Directory. Since it's brand new, Git doesn't know about its existence yet.
If you run git status, Git will report:
Untracked files:
  (use "git add <file>..." to include in what will be committed)
        feature.js
At this point, feature.js is Untracked. It exists in your project, but Git will completely ignore it until you tell it otherwise.
Stage 2: Coming into the "Light" - The git add Command
You've finished writing the first lines of code for feature.js and want Git to start managing it. This is when you use the git add command.
git add feature.js
This command does two important things:
- It tells Git: "Start tracking this file."
- It takes the current version of
feature.jsin the Working Directory and copies it into the Staging Area.
Now, feature.js has moved to the Staged state. Run git status again, and you'll see:
Changes to be committed:
  (use "git restore --staged <file>..." to unstage)
        new file:   feature.js
Stage 3: Becoming "Immortal" - The git commit Command
The Staging Area is now like a perfect draft for the next save. You're ready to record this milestone in history. The git commit command will do that.
git commit -m "Add initial structure for new feature"
This command takes a "snapshot" of all files in the Staging Area, bundles them into a commit, and stores them permanently in the Local Repository.
After committing, feature.js is now in the Committed state. Your Working Directory is considered "clean" because it matches the just-saved version in the repository. git status will report:
nothing to commit, working tree clean
Stage 4: The Cycle of Change
The journey isn't over. The next day, you open feature.js and add a new function. As soon as you save the file, Git detects that the version in the Working Directory is different from the last saved version in the repository.
The file immediately moves to the Modified state. git status will show:
Changes not staged for commit:
  (use "git add <file>..." to update what will be committed)
  (use "git restore <file>..." to discard changes in working directory)
        modified:   feature.js
To save this change, you must repeat the cycle:
git add feature.js: Put the modified version back into the Staging Area.git commit -m "Implement new function": Save the new snapshot from the Staging Area into the repository.
And so, the file's life cycle continues: modify -> add -> commit.
An Easy Analogy: The Photo Studio
Imagine you're a photographer and your project is a photo shoot:
- Working Directory is the messy real-world scene.
- Staging Area (
git add) is when you carefully arrange everything in the frame. You pick the model, adjust the lighting, decide the angle. Only what's in the frame gets photographed. - Local Repository (
git commit) is when you press the shutter. The photo (snapshot) is taken and saved in the album (repository). That photo is immutable. You can't change it, but you can always take a new one.
This analogy explains why git add is so important. It gives you full control over which changes are good enough, complete enough to be included in the next "photo" in history, instead of having to capture the entire messy scene.
Other Helpful Tools
git diff: See the difference between the version in the Working Directory and the Staging Area. (What have you changed but not yetadded?).git diff --staged: See the difference between the version in the Staging Area and the last commit. (What have youadded and is ready tocommit?).git rm <file>: Remove a file from the Working Directory and also stage that removal..gitignore: A special file where you list files or folders you want Git to completely ignore (e.g., log files, folders with installed packages, etc.).
Understanding this life cycle not only helps you use Git with confidence but also helps you troubleshoot issues effectively. Next time you type git status, you won't just read its message—you'll understand the story Git is telling about your files.
![[Git Basics] How to Install and Configure Git Initially: What You Need to Know](/images/blog/how-to-install-and-configure-git-initially-thumbnail.webp)
![[Git Basics] What is a Remote Repository? Everything You Need to Know](/images/blog/what-is-remote-repository-thumbnail.webp)
![[Git Basics] Mastering Git Merge with Detailed Guide and Examples](/images/blog/master-git-merge-thumbnail.webp)
![[Git Basics] What is the .gitignore File? How to Use It Effectively for Every Project](/images/blog/gitignore-file-thumbnail.webp)