Have you ever found yourself copy-pasting the Header, Navbar, or Footer into every page of your app? That’s when Layouts in Next.js shine as a true "savior." Layouts aren’t just a feature—they’re the foundation for a robust, maintainable, and super-efficient web architecture.
In this article, we’ll break down everything about Layouts in Next.js: from core concepts, the revolutionary differences between App Router and Pages Router, to advanced techniques for building complex UIs. Get ready to level up your Next.js skills! 🚀
Why Are Layouts So Important?
Before diving into implementation, let’s understand why you should care about Layouts.
- Reusability (Don’t Repeat Yourself - DRY): The most obvious benefit. You define shared elements like header, footer, sidebar once and apply them to many pages.
- Consistent UI: Ensures every page in your app follows a common structure and style, delivering a seamless and professional user experience.
- Performance optimization: When users navigate between pages sharing the same layout, Next.js only re-renders the page content. The layout is preserved, keeping its state and making page transitions much faster.
- Easier code management: Separating layout logic from page logic keeps your codebase clean, organized, and easier to maintain or upgrade later.
The Layout Revolution with App Router (Next.js 13+)
With the App Router, Next.js has completely redefined how we build layouts. It’s now more intuitive, powerful, and flexible than ever.
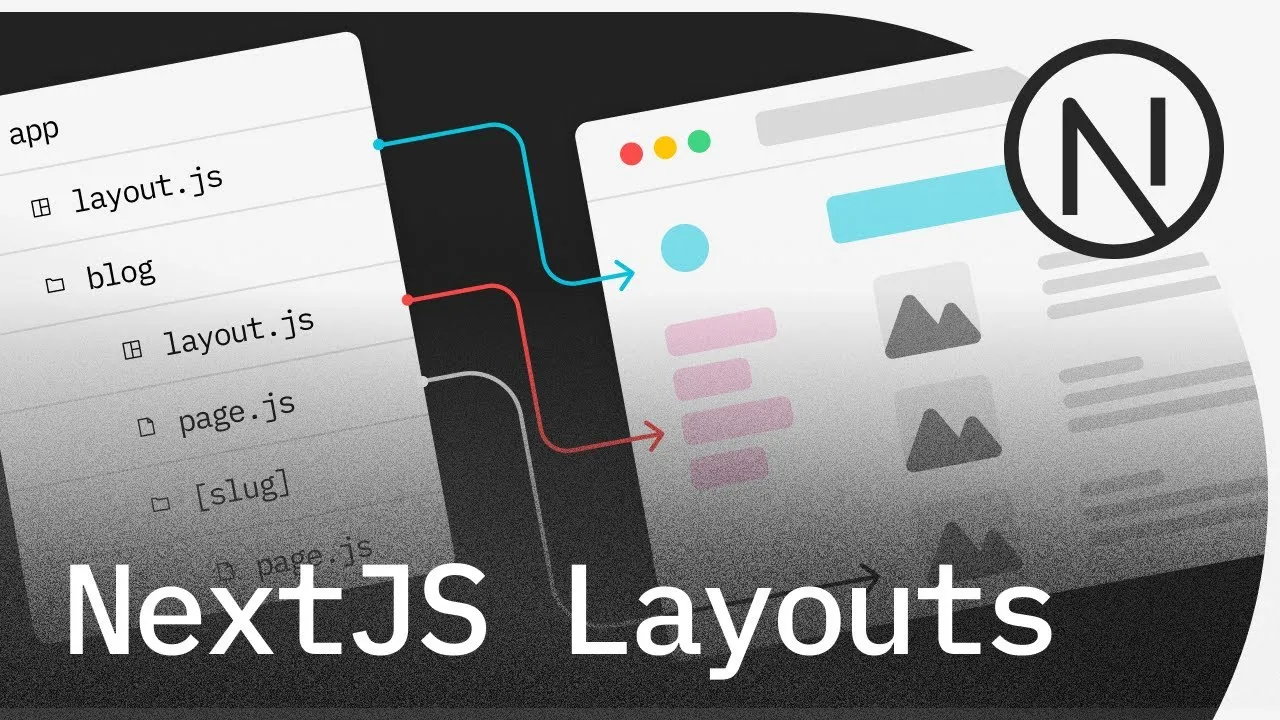
1. layout.js – The "Heart" of the System
In the App Router, a layout is defined by creating a special file named layout.js (or .tsx). This file automatically wraps all page.js files and nested layouts in the same folder and its subfolders.
Root Layout
Every App Router app must have a Root Layout at app/layout.js. This is the top-level layout, where you define the <html> and <body> tags.
Example app/layout.js:
// app/layout.tsx
import './globals.css'
import Navbar from '@/components/Navbar'
import Footer from '@/components/Footer'

// Metadata – Great for SEO
export const metadata = {
  title: 'My Awesome App',
  description: 'Generated by create next app',
}

export default function RootLayout({ children }) {
  return (
    <html lang="en">
      <body>
        <Navbar />
        <main>{children}</main>{' '}
        {/* children here is the content of pages (page.js) */}
        <Footer />
      </body>
    </html>
  )
}
💡 Key point: The
childrenprop is where the content of pages or nested layouts will be rendered. Your layout acts as a frame, andchildrenis the picture inside.
2. Nested Layouts – Next-Level Power
This is where the App Router truly shines. You can easily create nested layouts by adding a layout.js file to subfolders. The child layout wraps the pages in that folder and is itself wrapped by its parent layout.
Imagine you have an admin dashboard:
app/dashboard/layout.js: This layout might include a sidebar just for the dashboard.app/dashboard/page.js: The dashboard overview page.app/dashboard/settings/page.js: The settings page.
Example app/dashboard/layout.js:
// app/dashboard/layout.tsx
import DashboardSidebar from '@/components/DashboardSidebar'

export default function DashboardLayout({ children }) {
  return (
    <section className="dashboard-container">
      <DashboardSidebar />
      {/* children here will be page.js or other nested layouts in the dashboard folder */}
      <div className="dashboard-content">{children}</div>
    </section>
  )
}
When a user visits /dashboard/settings, the component structure will be:
RootLayout(with Navbar and Footer)DashboardLayout(withDashboardSidebar)SettingsPage(the settings page content)
The best part: when you navigate from /dashboard to /dashboard/settings, only the page content changes. Both RootLayout and DashboardLayout are preserved, keeping their state and not re-rendering!
The "Classic" Approach with Pages Router
If you’re working on an older project using the Pages Router, layout handling is different. There are two common patterns:
1. Per-Page Layouts
This is the most flexible way. You define a getLayout property on your page component.
Step 1: Create your Layout component.
// components/DashboardLayout.js
export default function DashboardLayout({ children }) {
  return (
    <div>
      <DashboardSidebar />
      <main>{children}</main>
    </div>
  )
}
Step 2: Edit _app.js.
// pages/_app.js
export default function MyApp({ Component, pageProps }) {
  // Use the layout defined at the page level, if any
  const getLayout = Component.getLayout || ((page) => page)

  return getLayout(<Component {...pageProps} />)
}
Step 3: Apply the layout to your page.
// pages/dashboard/index.js
import DashboardLayout from '@/components/DashboardLayout'

function DashboardPage() {
  return <h1>Welcome to the Dashboard!</h1>
}

// Assign layout to this page
DashboardPage.getLayout = function getLayout(page) {
  return <DashboardLayout>{page}</DashboardLayout>
}

export default DashboardPage
2. Global Layout in _app.js
If your whole app uses a single layout, you can wrap it directly in pages/_app.js.
// pages/_app.js
import Layout from '../components/Layout'

export default function MyApp({ Component, pageProps }) {
  return (
    <Layout>
      <Component {...pageProps} />
    </Layout>
  )
}
This is simple but less flexible, as it’s hard to apply different layouts to different pages.
Advanced Concepts & Real-World Scenarios
Layouts and Data Fetching
In the App Router, layouts are Server Components by default. This means you can fetch data directly inside them using async/await—no need for useEffect or getStaticProps.
// app/layout.tsx
async function getUserData() {
  // Suppose this fetches the logged-in user info
  const user = await fetchUserDataFromAPI()
  return user
}

export default async function RootLayout({ children }) {
  const user = await getUserData()

  return (
    <html>
      <body>
        <Navbar user={user} /> {/* Pass data down to child components */}
        <main>{children}</main>
      </body>
    </html>
  )
}
Layouts and State Management
One of the biggest benefits of layouts in the App Router is state preservation. Because layouts don’t re-render when navigating between child pages, any state (e.g., useState in a Client Component) or context provider placed in a layout will be preserved. This is ideal for features like shopping carts, music players, or light/dark themes.
Conditional Layouts
How do you apply different layouts to different groups of pages (e.g., marketing pages vs. app pages)? Route Groups in the App Router are the answer. By placing a group of routes in a folder with parentheses, e.g., (marketing), that folder won’t affect the URL but lets you create a separate layout.js for that group.
app/(marketing)/layout.js: Layout for home, about, contact pages.app/(app)/layout.js: Layout for dashboard, settings, etc. when the user is logged in.
Conclusion: Layouts and App Router Are the Future
Layouts are a foundational but incredibly powerful concept in Next.js. Mastering them—especially with the App Router—will help you build web apps that are not only fast and robust, but also have a clear, maintainable structure.
| Feature | App Router (app/layout.js) | Pages Router (_app.js & getLayout) |
|---|---|---|
| Architecture | File-based, automatic nesting | Custom in _app.js or per-page |
| Nested layouts | Natural, very powerful | Manual, more complex |
| Data Fetching | Simple with Server Components (async/await) | Use getServerSideProps / getStaticProps |
| State Preserved | Automatic when navigating child pages | Hard to achieve naturally |
| Flexibility | Very high, easily extensible | Good with getLayout, but code is more complex |
That’s the full guide—now go build amazing UIs with the power of Next.js Layouts!
![[Next.js Tutorial] A Simple and Effective Guide to Deploying Your Next.js App](/images/blog/deploy-nextjs-app.webp)
![[Next.js Tutorial] Caching: The Secret to Making Your Website 10x Faster](/images/blog/caching-in-nextjs.webp)
![[Next.js Tutorial] Testing: The Complete Guide to Unit, Integration, and E2E Testing](/images/blog/testing-in-nextjs.webp)
![[Next.js Tutorial] Basic Directory Structure and Routing in Your Project](/images/blog/basic-directory-structure-and-routing-in-nextjs.webp)