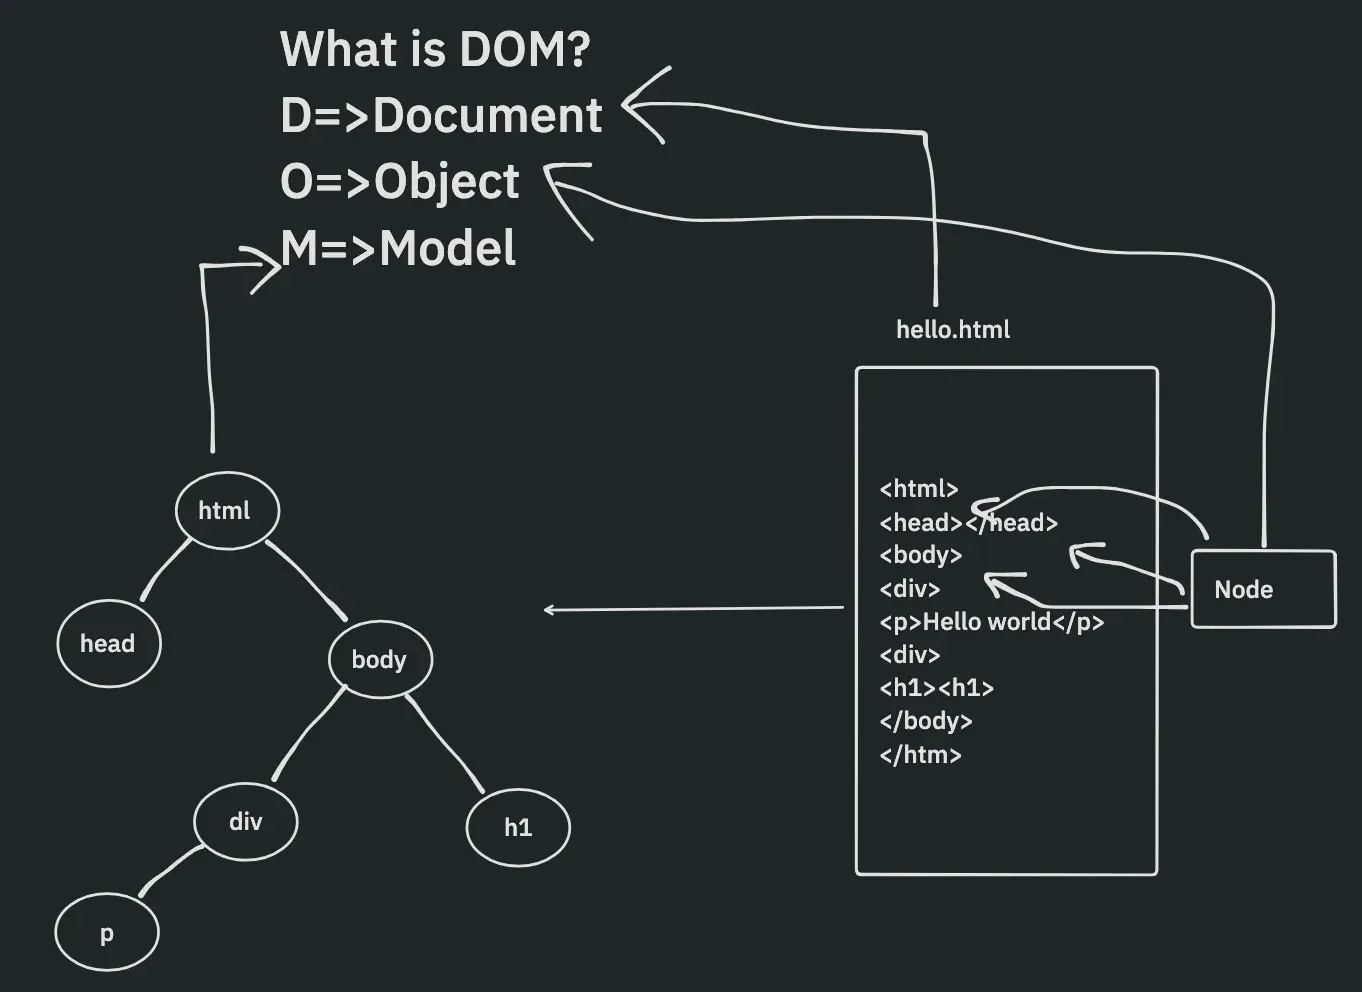
Have you ever wondered how websites can instantly respond to user interactions, changing content without reloading the page? The "magic" behind this is the DOM and the ability to manipulate it with JavaScript.

This article is a comprehensive guide to help you go from a complete beginner to a pro at "controlling" the elements on your web page.
What is the DOM? Why is it important?
Imagine your website as a house. HTML is the blueprint, defining the rooms (tags like <div>, <p>, <h1>). But to repaint a wall, move furniture, or turn the lights on and off, you need a 3D model of the house that lets you interact with each object.
That’s the DOM (Document Object Model). The browser creates a tree structure from your HTML code, where every element, attribute, and text becomes a "node" in this tree. JavaScript can access and "talk" to this DOM tree, allowing us to:
- Change content: Update text, images, or any content on the page.
- Change attributes: Modify HTML attributes like an image’s
srcor a link’shref. - Change CSS: Add, remove, or directly edit element styles to change appearance.
- Respond to events: Listen for user actions like clicks or keypresses and run code in response.
- Create and remove elements: Flexibly add new elements to the page or remove unnecessary ones.

Mastering DOM manipulation is a foundational and extremely important skill for any web developer.
Step 1: "Pick the Right Element" – Accessing DOM Elements
Before you can change anything, you need to select the element you want to work with. JavaScript provides several powerful methods for this.
The most common methods:
-
getElementById('id'): The fastest and most efficient way to select a single element by itsidattribute.const mainTitle = document.getElementById('main-title') -
getElementsByClassName('class-name'): Returns an (HTMLCollection) of all elements with the same CSS class.const noteItems = document.getElementsByClassName('note') -
getElementsByTagName('tag-name'): Returns a collection of all elements with the same tag name (e.g.,p,li,div).const allParagraphs = document.getElementsByTagName('p') -
querySelector('css-selector'): An extremely flexible method that lets you use any CSS selector (e.g.,#id,.class,tag[attribute]) to find and return the first matching element.const firstButton = document.querySelector('.btn-primary') -
querySelectorAll('css-selector'): LikequerySelector, but returns a (NodeList) of all elements matching the selector.const allImportantLinks = document.querySelectorAll('a[target="_blank"]')
Tip: querySelector and querySelectorAll are often preferred for their flexibility and familiar syntax for developers with CSS experience.
Step 2: "Give It a Makeover" – Editing DOM Elements
Once you’ve "got your hands on" the desired element, you can start changing it.
Changing content:
-
textContent: Get or set the plain text content inside an element, ignoring any HTML tags.const greeting = document.getElementById('greeting') greeting.textContent = 'Welcome to the world of DOM!' -
innerHTML: Get or set the entire HTML content inside an element. Be careful when usinginnerHTMLwith user data, as it can lead to XSS (Cross-Site Scripting) security vulnerabilities.const userInfo = document.getElementById('user-info') userInfo.innerHTML = '<h3>User Name</h3><p>John Doe</p>'
Changing attributes and styles:
-
Set attributes: Use the
setAttribute('attribute-name', 'value')method.const profileImage = document.getElementById('profile-pic') profileImage.setAttribute('src', 'images/new-avatar.jpg') -
Change styles: Access the element’s
styleproperty and set CSS properties. Note that CSS property names become camelCase (e.g.,background-colorbecomesbackgroundColor).const notification = document.getElementById('notification') notification.style.backgroundColor = 'lightblue' notification.style.padding = '20px' notification.style.border = '1px solid blue' -
Working with classes: The
classListproperty provides convenient methods for managing CSS classes.const menu = document.getElementById('main-menu') menu.classList.add('active') // Add 'active' class menu.classList.remove('hidden') // Remove 'hidden' class menu.classList.toggle('expanded') // Add if not present, remove if present
Step 3: "Add New Members" – Creating and Inserting New Elements
You can create new HTML elements from scratch and add them to the DOM tree.
- Create a new element:
document.createElement('tag-name') - Add content (if needed): Set
textContentorinnerHTML. - Add to the DOM:
parentElement.appendChild(newElement): Add as the last child of the parent.parentElement.insertBefore(newElement, referenceElement): Insert before an existing child.
Example: Add a new item to a list
<ul id="my-list">
  <li>Item 1</li>
</ul>
// 1. Select the parent list
const list = document.getElementById('my-list')

// 2. Create a new <li> element
const newItem = document.createElement('li')

// 3. Add content
newItem.textContent = 'Item 2'

// 4. Insert into the list
list.appendChild(newItem)
Step 4: "Listen to the Beat" – Handling Events
This is the fun part: making your website interactive. By using event listeners, you can run JavaScript code when a specific event happens on an element.
The most common and powerful method is addEventListener().
Syntax: element.addEventListener('event-name', handlerFunction);
Common events:
click: When the user clicks the element.mouseover: When the mouse pointer enters the element.mouseout: When the mouse pointer leaves the element.keydown: When a key is pressed down.submit: When a form is submitted.
Example: Change text when a button is clicked
<p id="message">Click the button!</p>
<button id="action-btn">Change!</button>
const message = document.getElementById('message')
const button = document.getElementById('action-btn')

button.addEventListener('click', function () {
  message.textContent = 'You have changed it successfully!'
  message.style.color = 'green'
})
By combining selection, modification, and event listening techniques, you can create rich, dynamic user experiences—from form validation and visual effects to building complex web applications. Your journey to mastering web interfaces starts with these basic DOM manipulations.
Good luck on your journey to mastering JavaScript!
![[JS Basics] Loops in JavaScript: A Detailed Guide for Beginners](/images/blog/loops-in-javascript.webp)
![[JS Basics] How to Set Up a JavaScript Runtime Environment](/images/blog/setting-up-the-javascript-runtime-environment.webp)
![[JS Basics] Conditional Statements in JavaScript: Examples & Effective Usage](/images/blog/conditional-statements-in-javascript.webp)
![[JS Basics] Demystifying the this Keyword in JavaScript: When and How to Use It?](/images/blog/this-keyword-in-javascript.webp)