For any developer working with Git, perhaps nothing is more "paralyzing" than seeing: CONFLICT (content): Merge conflict in [file-name]. That's the moment when the usually smart Git engine has to stop and say: "Hey, I don't know what to do with these two different versions of the same code. You decide!"
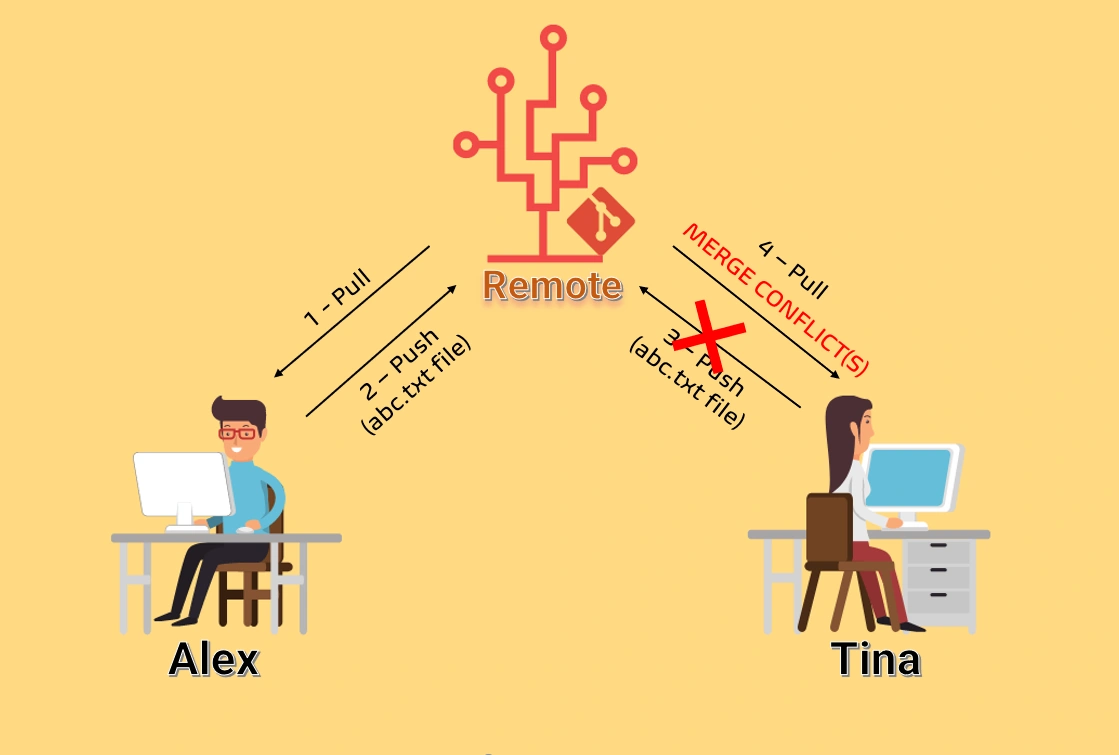
A merge conflict is not a bug—it's a natural and inevitable part of team collaboration. It signals that your team is actively contributing and developing the product. However, if you don't understand its nature and how to handle it, it can become a nightmare, slowing progress and causing unnecessary errors.
That's why this article is here: to help you turn the fear of "merge conflict" into a skill you can handle professionally and confidently.
What is a Merge Conflict and Why Does It Happen?
Imagine you and a colleague are both assigned to edit a document.
- You edit the first sentence of the second paragraph.
- Your colleague also edits the exact same sentence, but in a different way.
When both submit their changes, the manager is confused. They don't know whether to choose your version, your colleague's, or combine both.
In Git, this happens when:
Git cannot automatically decide how to merge two branches because there are overlapping changes on the same (or multiple) lines of code in the same file.
The most common causes include:
- Two people edit the same line of code on different branches.
- One person deletes a file while another edits it.
- Both add a file with the same name but different content.
Anatomy of a Merge Conflict
When a conflict occurs, Git will not complete the merge. Instead, it marks the conflicted files and inserts special "conflict markers". If you open a conflicted file, you'll see something like this:
// Code not in conflict
function sayHello() {
<<<<<<< HEAD
  console.log("Hello, World!");
=======
  console.log("Xin chào, Thế giới!");
>>>>>>> feature/add-vietnamese-greeting
}
// Other code not in conflict
Let's break down these markers:
<<<<<<< HEAD: Start of changes from your current branch (the branch you're on when runninggit merge).HEADpoints to the latest commit on your branch.=======: The "boundary" separating the two conflicting versions.>>>>>>> feature/add-vietnamese-greeting: End of changes from the branch you're merging in (in this example,feature/add-vietnamese-greeting).
Your job is to act as the "referee": review both versions, decide what the final code should look like, and then remove all the special markers.
4-Step Standard Process to Resolve Merge Conflicts (Command Line)
When facing a conflict, don't panic. Calmly follow these steps:
Step 1: Identify Conflicted Files
After running git merge or git pull and seeing an error, the first command you should type is:
git status
Git will clearly list files in the unmerged paths state. These are the "patients" you need to treat.
On branch main
You have unmerged paths.
  (fix conflicts and run "git commit")
  (use "git merge --abort" to abort the merge)

Unmerged paths:
  (use "git add <file>..." to mark resolution)
        both modified:   index.js
Step 2: Open Files and Decide
Open each conflicted file in your favorite code editor. Now it's time to make decisions based on logic and, if needed, discussion with teammates:
- Keep your version (
HEAD): Delete everything from=======to>>>>>>> .... - Accept the other branch's version: Delete everything from
<<<<<<< HEADto=======. - Combine both: This is the most common case. Manually edit, select the best parts from both versions, and merge them into a complete, correct code block.
For example, after resolving, index.js might look like:
// Suppose we decide to keep both and display them
function sayHello() {
  console.log('Hello, World!')
  console.log('Xin chào, Thế giới!')
}
Important: After editing, make sure to remove all <<<<<<<, =======, and >>>>>>> lines.
Step 3: Mark Conflict as Resolved
After cleaning up a file, tell Git you've resolved it:
git add [fixed-file-name]

# Example:
git add index.js
Here, git add doesn't add a new file, but "marks" it as resolved and ready to commit.
Step 4: Complete the Merge
Once you've git added all conflicted files, check again with git status. You'll see them under "Changes to be committed".
Now, just create a commit to finish the merge:
git commit
When you run this, Git will open a text editor with a default commit message, usually Merge branch '[branch-name]'. You can keep or edit this message. Save and close the file, and you're done!
You've successfully resolved a merge conflict.
💡 Safe Exit: If you feel overwhelmed and want to return to the pre-merge state, use this magic command:
git merge --abort
Using GUI Tools – An Easier Way
Most modern developers use graphical tools, which make resolving conflicts much more intuitive and easy.
VS Code – Your Trusty Companion
VS Code is one of the best tools for handling conflicts. When you open a conflicted file, it automatically detects and provides options right above the conflicted code:
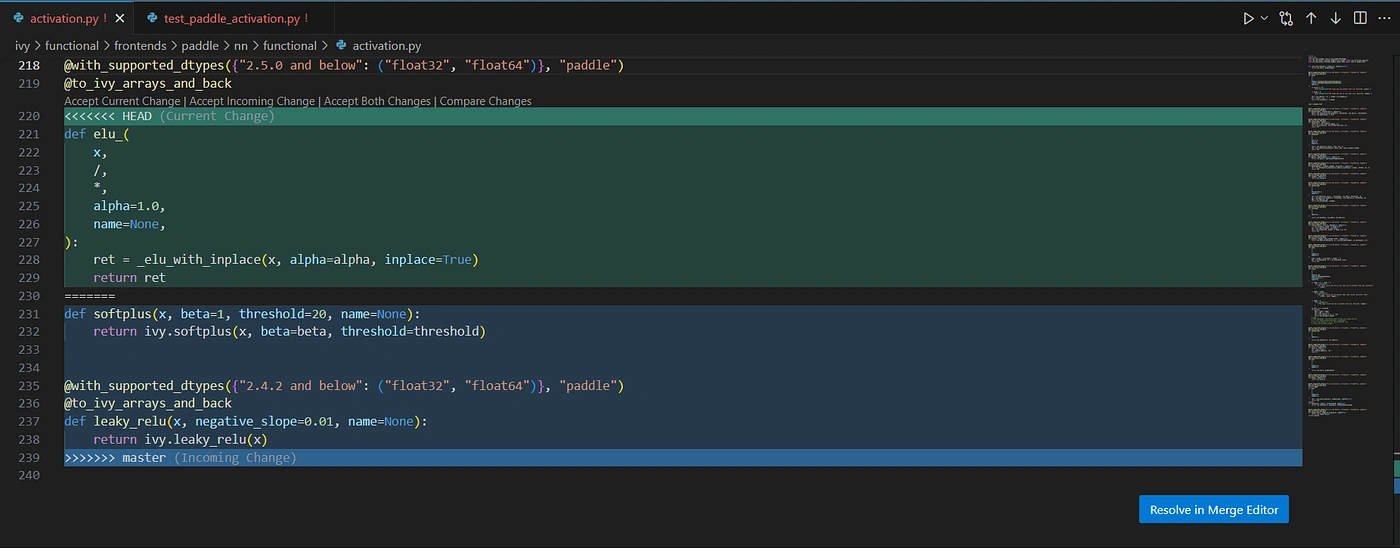
- Accept Current Change: Keep your version (
HEAD). - Accept Incoming Change: Keep the other branch's version.
- Accept Both Changes: Keep both versions, one after the other.
- Compare Changes: Opens a side-by-side comparison, making it easy to decide.
After clicking, VS Code will automatically clean up the conflict markers. All you need to do is save the file, then go to Source Control (the branch icon), stage (same as git add), and commit.
Other Tools
Tools like GitKraken, Sourcetree, GitHub Desktop also provide powerful "merge tool" interfaces, letting you compare and choose each line visually.
Pro Tips to Avoid Merge Conflicts
Handling conflicts is a skill, but avoiding them is an art.
- Communicate often: Always talk to your team about what you're working on, especially when touching core or shared files.
- Pull frequently: Before starting a new feature or pushing code, always
git pull(orgit pull --rebase) from the main branch (likemainordevelop) to update with the latest changes. - Keep branches short-lived and small: Don't create a feature branch and "hold" it for weeks. The smaller and more focused a Pull Request (PR) is, the less likely it is to cause conflicts and the easier it is to review.
- Use
git pull --rebase: Instead ofgit pull(which creates a merge commit),git pull --rebaseputs your commits on top of the latest remote commits. This keeps the commit history straight and clean, and any conflicts (if any) are resolved on your commits, making them easier to manage.
Conclusion: Change Your Mindset
Instead of seeing merge conflicts as obstacles, view them as opportunities to pause, "sync up with teammates," and ensure the final code is the best combination of everyone's efforts.
By understanding the nature of conflicts, mastering the resolution process on both the command line and GUI tools, and applying smart prevention strategies, you'll no longer break a sweat when Git reports a conflict.
Congratulations, you've just conquered one of the most important skills for a modern developer!
![[Git Basics] How to Use Git log: Mastering Commit History](/images/blog/how-to-use-git-log-thumbnail.webp)
![[Git Basics] How to Connect & Interact Effectively with Remote Repositories](/images/blog/connect-and-interact-with-the-remote-repository-thumbnail.webp)
![[Git Basics] What is a Git Branch? Mastering Branches in Git](/images/blog/what-is-git-branch-thumbnail.webp)
![[Git Basics] What is a Remote Repository? Everything You Need to Know](/images/blog/what-is-remote-repository-thumbnail.webp)