The previous article was about what Spring Boot is: a packaging of the Spring container with defaults already chosen, so a project starts as one class with one annotation. That is the last conceptual sentence you will read here. This article is the hands-on one, and you should finish it with an application running on your own machine answering HTTP requests.
Everything below was produced by running it. The commands were executed, the project was generated, built and started, the endpoints were called with curl, and every error in the troubleshooting section was deliberately reproduced. The log lines and error messages are copied out of a terminal, not remembered.
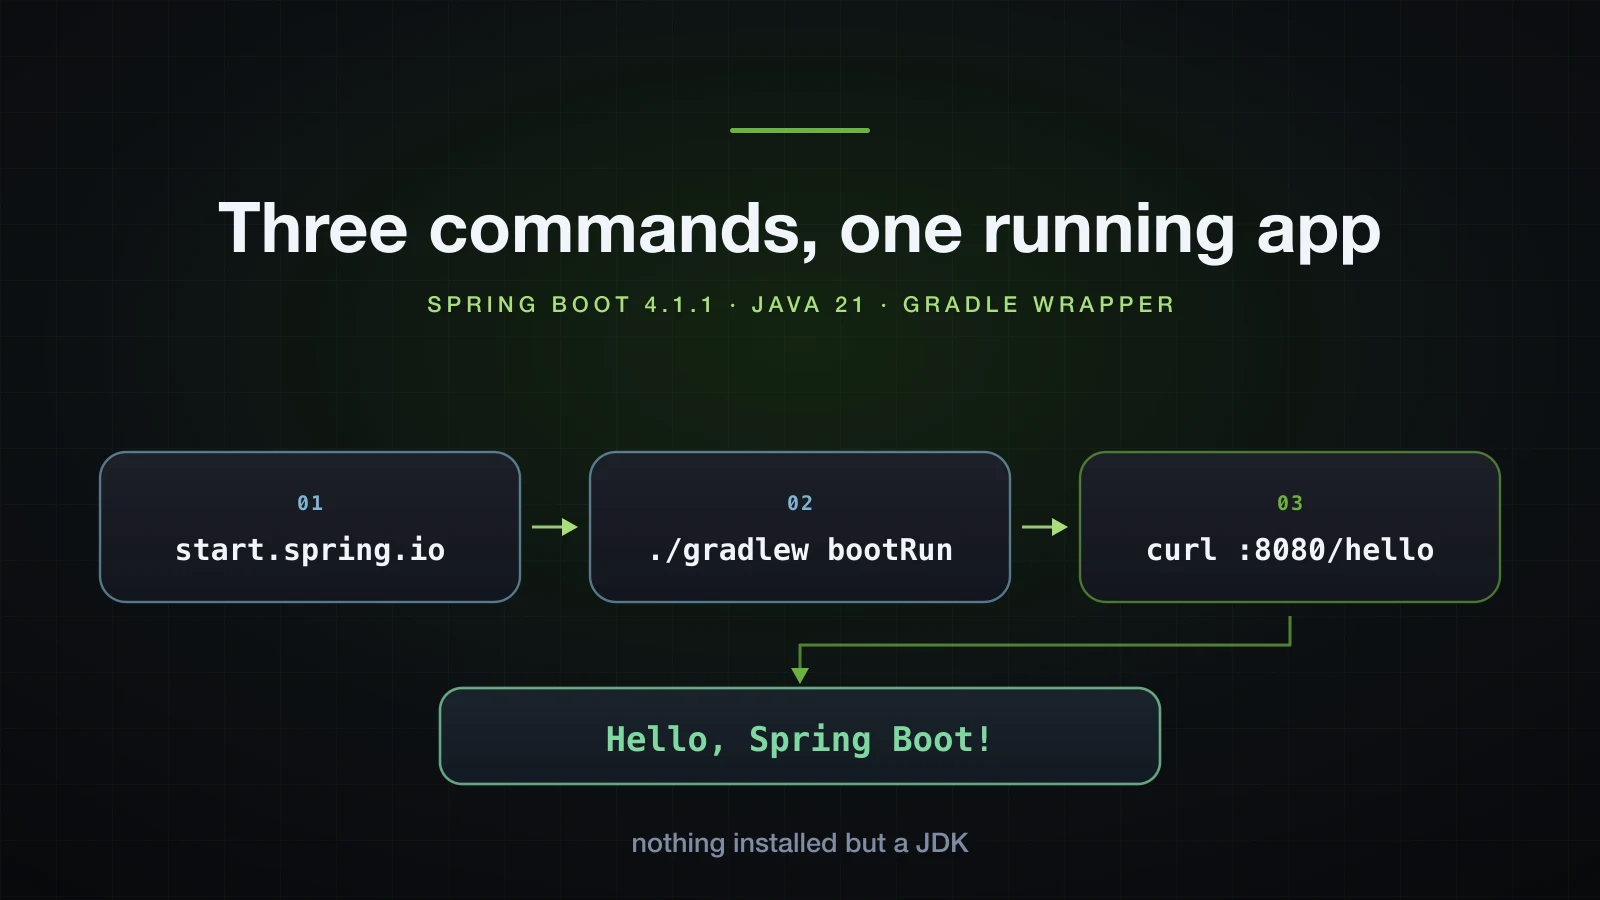
The target is Spring Boot 4.1.1 on OpenJDK 21.0.6, built with Gradle. Your machine needs exactly one thing installed: a JDK.
Installing the JDK
Spring Boot 4 requires Java 17 as a minimum. This series uses Java 21 because it is the Long Term Support release that Boot 4 was designed around, and because Spring Initializr offers it as a first-class option. Any distribution of OpenJDK works — Temurin, Corretto, Zulu, Microsoft, Liberica, Homebrew's build. They are all the same JDK with different build infrastructure behind them.
macOS
The shortest route is Homebrew:
brew install openjdk@21Homebrew installs this formula keg-only, which means it deliberately does not put it on your PATH, because it is an alternate version of the openjdk formula. The install prints exactly what to do about it:
For the system Java wrappers to find this JDK, symlink it with
  sudo ln -sfn /opt/homebrew/opt/openjdk@21/libexec/openjdk.jdk /Library/Java/JavaVirtualMachines/openjdk-21.jdk
Run that line. Without it, /usr/bin/java will not see the JDK you just installed and you will spend twenty minutes wondering why. On an Intel Mac the prefix is /usr/local instead of /opt/homebrew.
If you would rather have a signed installer that registers itself properly on its own, use the Adoptium/Temurin build — brew install --cask temurin@21, or the .pkg from adoptium.net. The cask installs into /Library/Java/JavaVirtualMachines directly, so there is no symlink step.
Windows
winget install --id EclipseAdoptium.Temurin.21.JDKOr download the .msi from adoptium.net. In the installer's custom setup step, turn on Set JAVA_HOME variable — Temurin adds itself to PATH by default but leaves JAVA_HOME alone, and a missing JAVA_HOME is the cause of most "works in the IDE, fails in the terminal" reports. Open a new terminal afterwards: environment variables are read at process start, so an already-open window will not see them.
Linux
sudo apt install openjdk-21-jdk          # Debian, Ubuntu
sudo dnf install java-21-openjdk-devel   # Fedora, RHEL, Rocky
sudo pacman -S jdk21-openjdk             # Arch
Note the -jdk and -devel suffixes. The plain openjdk-21-jre and java-21-openjdk packages give you a runtime with no compiler, which is enough to run a jar and not enough to build one.
Verifying the installation
Two commands, and both have to answer:
$ java -version
openjdk version "21.0.6" 2025-01-21
OpenJDK Runtime Environment Homebrew (build 21.0.6)
OpenJDK 64-Bit Server VM Homebrew (build 21.0.6, mixed mode, sharing)

$ javac -version
javac 21.0.6
java is the runtime and javac is the compiler. If java -version works and javac -version says "command not found", you installed a JRE, not a JDK. Install the JDK package and try again.
Note that java -version prints to stderr, not stdout. That is not a bug, and it is why java -version | grep 21 appears to print nothing.
When JAVA_HOME points at the wrong JDK
This is the single most common setup problem, and it happens the moment you have two JDKs on one machine — which you will, as soon as one project needs 17 and another needs 21. The tools disagree: your shell's java comes from PATH, while Gradle, Maven and most IDEs read JAVA_HOME. When the two point at different installs, the symptoms make no sense.
On macOS, list what is actually installed:
$ /usr/libexec/java_home -V
Matching Java Virtual Machines (2):
    21.0.6 (arm64) "Homebrew" - "OpenJDK 21.0.6" /opt/homebrew/Cellar/openjdk@21/21.0.6/libexec/openjdk.jdk/Contents/Home
    17.0.14 (arm64) "Homebrew" - "OpenJDK 17.0.14" /opt/homebrew/Cellar/openjdk@17/17.0.14/libexec/openjdk.jdk/Contents/Home
Then pin the one you want, in ~/.zshrc:
export JAVA_HOME=$(/usr/libexec/java_home -v 21)
export PATH="$JAVA_HOME/bin:$PATH"
The equivalents on the other two platforms:
| macOS | Windows (PowerShell) | Linux | |
|---|---|---|---|
| List installed JDKs | /usr/libexec/java_home -V | Get-ChildItem 'C:\Program Files\Eclipse Adoptium' | update-alternatives --list java |
What is JAVA_HOME now | echo $JAVA_HOME | echo $env:JAVA_HOME | echo $JAVA_HOME |
| Which binary runs | which java | where.exe java | readlink -f $(which java) |
| Change it | export JAVA_HOME=$(/usr/libexec/java_home -v 21) | setx JAVA_HOME "C:\Program Files\Eclipse Adoptium\jdk-21" | sudo update-alternatives --config java |
| Where to make it stick | ~/.zshrc | System environment variables, then a new terminal | ~/.bashrc or /etc/environment |
The check that settles it: run java -version and echo $JAVA_HOME side by side and confirm they describe the same install. If they do not, the terminal and the build tool are using different compilers, and the error you get will be about class file versions rather than about the real problem.
Choosing an IDE: IntelliJ IDEA or VS Code
Either one works. The project is a plain Gradle project, so no IDE is required at all — the terminal is enough. What an IDE buys you is a debugger you will actually use and navigation that makes a framework codebase readable.
| IntelliJ IDEA | VS Code | |
|---|---|---|
| What to install | IntelliJ IDEA (one product since 2025.3 — the old Community/Ultimate split is gone) | VS Code + Extension Pack for Java (Microsoft) + Spring Boot Extension Pack (VMware) |
| Free tier covers | Java, Gradle, Maven, debugger, JUnit, a Spring Boot project wizard and basic Spring highlighting | everything listed; the extensions are free |
| Paid tier adds | an Ultimate subscription; JetBrains' own docs say "Spring support is limited in IntelliJ IDEA without the Ultimate subscription" | nothing |
| Generate a project | New Project → Spring Boot, which is the Initializr form inside the IDE | Ctrl+Shift+P → Spring Initializr: Create a Gradle Project |
| Running the app | gutter arrow next to main, or a Gradle bootRun task | Spring Boot Dashboard in the sidebar |
| Import model | reads build.gradle and downloads dependencies on open | same, via the Gradle for Java extension |
| Honest recommendation | fewer moving parts for a beginner; the Gradle import is more reliable | better if you already live in VS Code and want one editor for everything |
Three settings are worth fixing before you start, in either IDE:
- Project SDK / Java runtime: 21. In IntelliJ this is Project Structure → Project → SDK; in VS Code it is
java.configuration.runtimesin settings. An IDE quietly set to 17 while Gradle uses 21 produces red squiggles on code that compiles fine from the terminal. - File encoding: UTF-8. Both default to it now, but a project inherited from an older setup may not, and the symptom is mangled characters in string literals rather than an error.
- Annotation processing: on. You do not need it today. You will the first time you add Lombok, and an unexplained "cannot find symbol: method getName()" on a
@Dataclass is always this setting.
Spring Initializr, field by field
Spring Initializr is a code generator at start.spring.io. It does not do anything magic: it writes a build file, a directory tree, one class with a main method, one empty test, and the build-tool wrapper scripts. Every field on the form controls a specific line in a specific file.
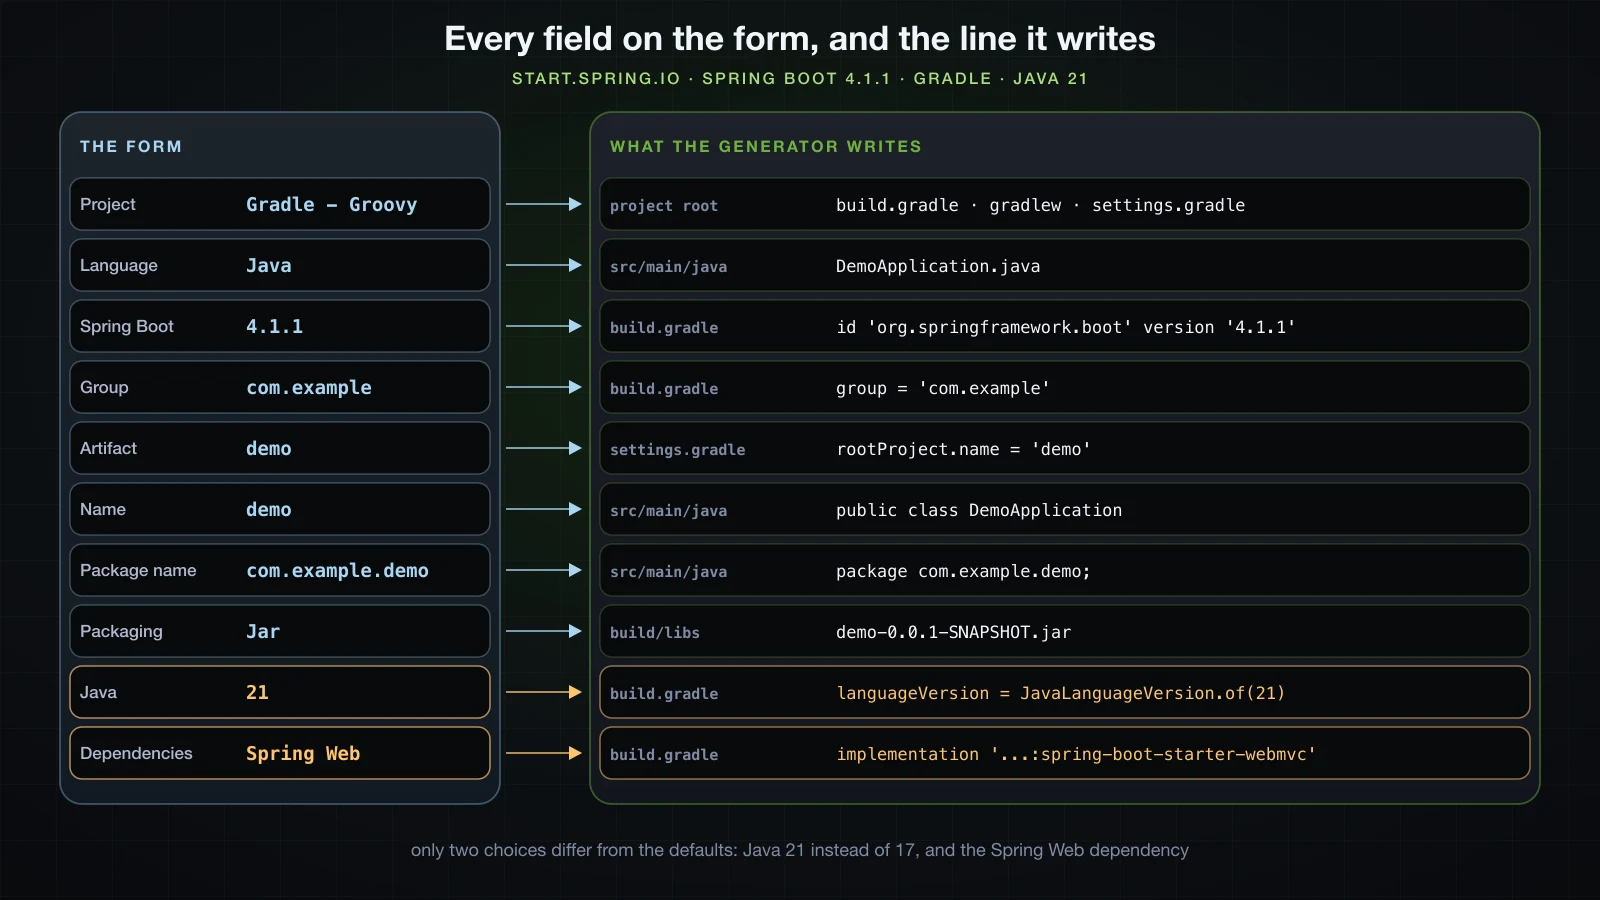
What each field actually decides:
- Project — which build tool gets generated. Leave it on Gradle - Groovy, which is the site's current default and what this series uses. You get
build.gradle,settings.gradleand thegradlewwrapper scripts. Article 4 covers the build file itself and the Maven equivalent. - Language — Java, Kotlin or Groovy. Java.
- Spring Boot — the version. The list mixes GA releases with
SNAPSHOTandM(milestone) builds. Pick the plain number. ASNAPSHOTis rebuilt continuously and can change under you between two builds on the same day; anMbuild is a pre-release that may still move APIs. Today the default is 4.1.1, which is what you want. - Group — your reverse-domain namespace,
com.examplefor learning. It becomesgroup = 'com.example'in the build file and the first part of the published coordinates. - Artifact — the project's name as a build artifact,
demo. It becomesrootProject.name = 'demo'and the name of the jar file. - Name — the human name, which drives the generated main class:
demoproducesDemoApplication.java. - Package name — the root package,
com.example.demo. This one matters more than it looks: it decides both the directory tree undersrc/main/javaand which packages get scanned for your components. Put your classes underneath it. (Article 4 explains the scanning rule; the troubleshooting section below shows the symptom when you break it.) - Packaging — Jar, always, unless you have been handed an existing servlet container to deploy into. A Jar embeds its own Tomcat and runs with
java -jar. A War is a bundle to be deployed into a Tomcat someone else operates, which is a deployment model you would know you needed. - Java — change this. The form currently defaults to 17; set it to 21. It becomes
JavaLanguageVersion.of(21)in the build file, which is what Gradle uses to pick a compiler. - Dependencies — add Spring Web. That is the one that gives you an embedded server and
@RestController.
⚠️ Boot 4 renamed the web starter. Ticking "Spring Web" now writes
spring-boot-starter-webmvc, and the test starter isspring-boot-starter-webmvc-test. On Boot 3 those werespring-boot-starter-webandspring-boot-starter-test. If you are following an older tutorial and paste its dependency block into a Boot 4 project, or paste a Boot 4 block into a Boot 3 project, the build fails to resolve the artifact. Trust the generated file over the tutorial.
The three ways to generate the project
The web form. Go to start.spring.io, fill in the fields above, press Generate, and unzip the download. There is an Explore button next to it that shows you every generated file in the browser before you commit to it, which is worth clicking once.
The IDE wizard. IntelliJ: File → New → Project → Spring Boot. VS Code: Ctrl+Shift+P → Spring Initializr: Create a Gradle Project. Both are the same form, calling the same API, and both drop you into the opened project when they are done.
One curl command. The site is an HTTP API, and every form field is a query parameter:
curl -s "https://start.spring.io/starter.zip?type=gradle-project&language=java&bootVersion=4.1.1&javaVersion=21&groupId=com.example&artifactId=demo&name=demo&packageName=com.example.demo&dependencies=web" -o demo.zip
unzip demo.zip -d demo
cd demo
The unzip prints what was written:
Archive:  demo.zip
   creating: demo/src
   creating: demo/src/test
   creating: demo/src/test/java
   creating: demo/src/test/java/com
   creating: demo/src/test/java/com/example
   creating: demo/src/test/java/com/example/demo
  inflating: demo/src/test/java/com/example/demo/DemoApplicationTests.java
   creating: demo/src/main
   creating: demo/src/main/java
   creating: demo/src/main/java/com
   creating: demo/src/main/java/com/example
   creating: demo/src/main/java/com/example/demo
  inflating: demo/src/main/java/com/example/demo/DemoApplication.java
   creating: demo/src/main/resources
  inflating: demo/src/main/resources/application.properties
   creating: demo/src/main/resources/templates
   creating: demo/src/main/resources/static
  inflating: demo/settings.gradle
   creating: demo/gradle
   creating: demo/gradle/wrapper
  inflating: demo/gradle/wrapper/gradle-wrapper.properties
  inflating: demo/gradle/wrapper/gradle-wrapper.jar
  inflating: demo/gradlew
  inflating: demo/.gitattributes
  inflating: demo/.gitignore
  inflating: demo/build.gradle
  inflating: demo/HELP.md
  inflating: demo/gradlew.bat
Twelve files. That is the whole project. This form is worth knowing because it is scriptable and because it makes the point that the website is not doing anything you cannot do from a terminal.
Running the application
Look at what is on your PATH:
$ which mvn gradle
mvn not found
gradle not found
Neither build tool is installed, and neither needs to be. The generated project ships a wrapper: gradlew on Unix, gradlew.bat on Windows, plus gradle/wrapper/gradle-wrapper.properties, which pins the exact version:
distributionUrl=https\://services.gradle.org/distributions/gradle-9.7.1-bin.zipThe wrapper downloads that exact Gradle on first use and caches it in ~/.gradle. Everyone who clones the repository gets Gradle 9.7.1, whatever they have installed globally. This is why you always type ./gradlew and never gradle.
It also means the first build is slow — it is downloading a Gradle distribution before it does anything else:
$ ./gradlew build
Fetching distribution.
Downloading https://services.gradle.org/distributions/gradle-9.7.1-bin.zip
..............10%..............20%...............30%..............40%...............50%..............60%...............70%..............80%..............90%...............100%

Welcome to Gradle 9.7.1!
...
Starting a Gradle Daemon (subsequent builds will be faster)
> Task :compileJava
> Task :processResources
> Task :classes
> Task :resolveMainClassName
> Task :bootJar
> Task :jar
> Task :assemble
> Task :compileTestJava
> Task :processTestResources NO-SOURCE
> Task :testClasses
> Task :test
> Task :check
> Task :build

BUILD SUCCESSFUL in 28s
7 actionable tasks: 7 executed
Twenty-eight seconds, of which most is the download and the dependency resolution. The second build of the same project, with nothing changed, finished in 374 ms and reported 7 actionable tasks: 7 up-to-date. If your first build seems to hang, it is downloading; give it a minute before you assume it is broken.
Now start it:
./gradlew bootRun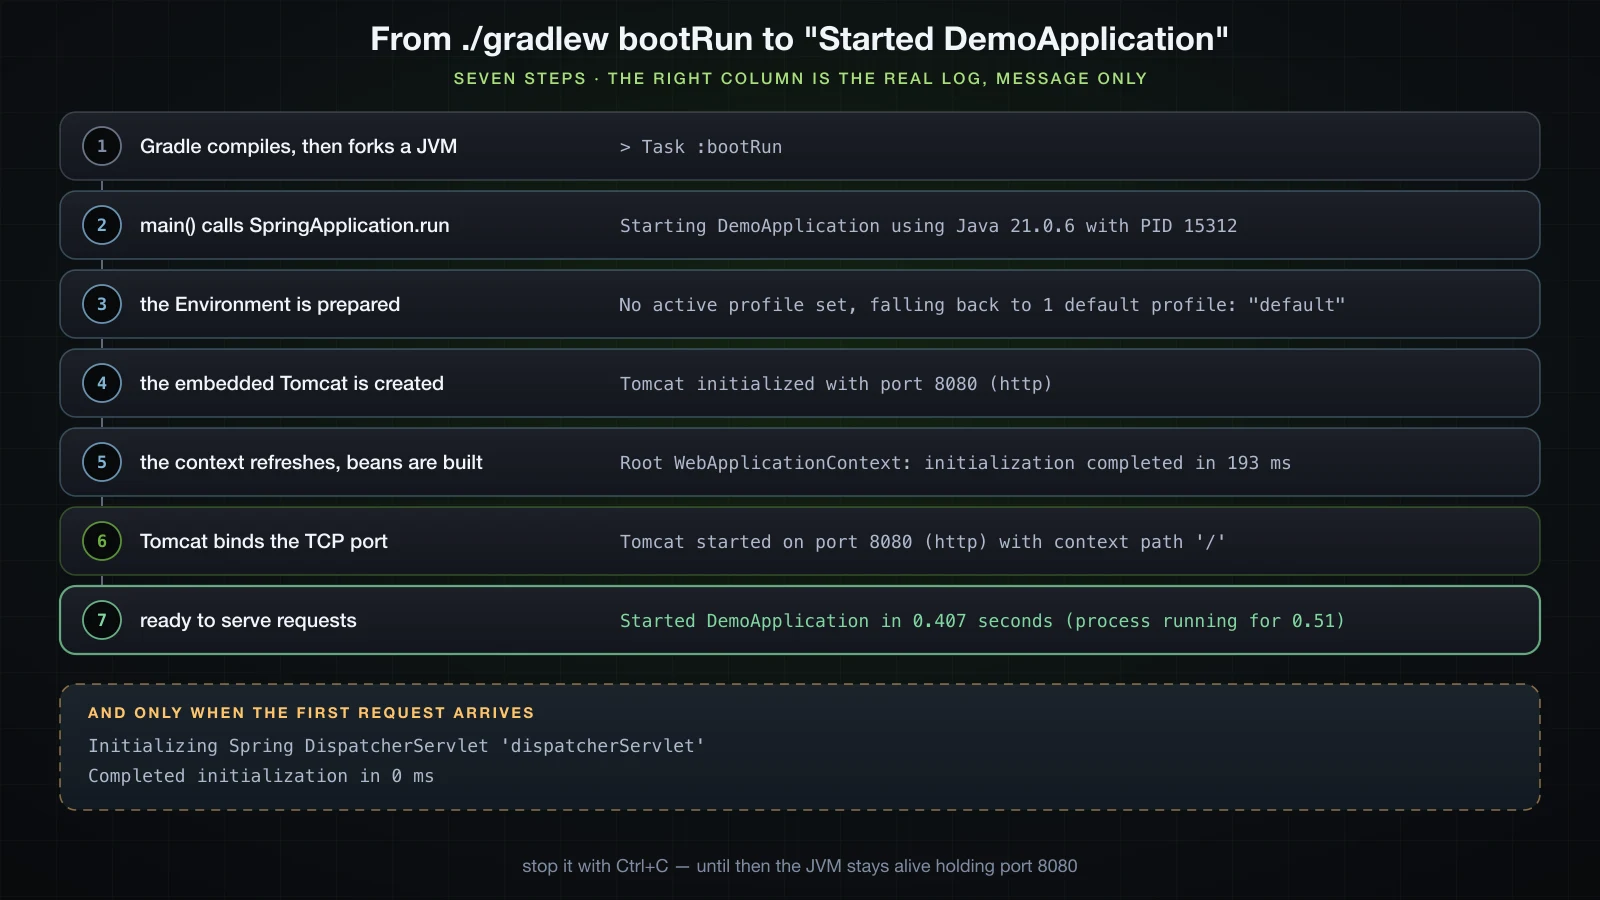
Here is the real output, on this machine, with the working directory shortened to /Users/you/demo:
  .   ____          _            __ _ _
 /\\ / ___'_ __ _ _(_)_ __  __ _ \ \ \ \
( ( )\___ | '_ | '_| | '_ \/ _` | \ \ \ \
 \\/  ___)| |_)| | | | | || (_| |  ) ) ) )
  '  |____| .__|_| |_|_| |_\__, | / / / /
 =========|_|==============|___/=/_/_/_/

 :: Spring Boot ::                (v4.1.1)

2026-09-11T10:11:08.693+07:00  INFO 15312 --- [demo] [           main] com.example.demo.DemoApplication         : Starting DemoApplication using Java 21.0.6 with PID 15312 (/Users/you/demo/build/classes/java/main started by you in /Users/you/demo)
2026-09-11T10:11:08.694+07:00  INFO 15312 --- [demo] [           main] com.example.demo.DemoApplication         : No active profile set, falling back to 1 default profile: "default"
2026-09-11T10:11:08.883+07:00  INFO 15312 --- [demo] [           main] o.s.boot.tomcat.TomcatWebServer          : Tomcat initialized with port 8080 (http)
2026-09-11T10:11:08.888+07:00  INFO 15312 --- [demo] [           main] o.apache.catalina.core.StandardService   : Starting service [Tomcat]
2026-09-11T10:11:08.888+07:00  INFO 15312 --- [demo] [           main] o.apache.catalina.core.StandardEngine    : Starting Servlet engine: [Apache Tomcat/11.0.24]
2026-09-11T10:11:08.899+07:00  INFO 15312 --- [demo] [           main] b.w.c.s.WebApplicationContextInitializer : Root WebApplicationContext: initialization completed in 193 ms
2026-09-11T10:11:08.984+07:00  INFO 15312 --- [demo] [           main] o.s.boot.tomcat.TomcatWebServer          : Tomcat started on port 8080 (http) with context path '/'
2026-09-11T10:11:08.986+07:00  INFO 15312 --- [demo] [           main] com.example.demo.DemoApplication         : Started DemoApplication in 0.407 seconds (process running for 0.51)
Read it once properly, because you will read a thousand of these:
| Line | What it tells you |
|---|---|
The ASCII banner and :: Spring Boot :: (v4.1.1) | the Boot version that is actually on the classpath — the first thing to check when a tutorial's code does not compile |
Starting DemoApplication using Java 21.0.6 with PID 15312 | the JVM that Gradle actually picked, and the process id you would use to kill it |
[demo] in every line | the value of spring.application.name from application.properties |
No active profile set, falling back to 1 default profile: "default" | no profile was requested, so only the default configuration is in play |
Tomcat initialized with port 8080 (http) | the embedded server object exists and has been told which port to want. It has not bound it yet |
Root WebApplicationContext: initialization completed in 193 ms | the container has finished constructing your beans. Anything that fails in your own code usually fails here |
Tomcat started on port 8080 (http) with context path '/' | the port is now bound. From this instant the application accepts connections |
Started DemoApplication in 0.407 seconds (process running for 0.51) | ready. The first number is the application, the second includes JVM startup |
That 0.407 is this machine on this day — treat every startup number you see anywhere, including your own, as indicative rather than a benchmark.
Two lines are missing, and their absence is the point. Send the first request and they appear:
Initializing Spring DispatcherServlet 'dispatcherServlet'
Completed initialization in 0 ms
The servlet that dispatches requests is initialised lazily, on the first request rather than at startup. If you never see those lines, nothing has ever called your application.
Stop it with Ctrl+C. The process stays alive holding port 8080 until you do.
Running it from the IDE
Open DemoApplication.java, click the green arrow in the gutter next to main, and you get the same log in the IDE's run window with a debugger attached. That is the whole difference: bootRun and the IDE run configuration both end up calling SpringApplication.run in the same JVM you would get from the terminal.
In VS Code the equivalent is the Spring Boot Dashboard in the sidebar, which lists every Boot application in the workspace with start, stop and debug buttons.
Do not run both at once. The second one will not start, for the reason in the troubleshooting section.
Running the packaged jar
bootRun is for development. What you deploy is a jar:
./gradlew build
java -jar build/libs/demo-0.0.1-SNAPSHOT.jar
You will find two files in build/libs: demo-0.0.1-SNAPSHOT.jar at about 19 MB, and demo-0.0.1-SNAPSHOT-plain.jar at a few kilobytes. Run the big one — it contains your classes and every dependency and the embedded Tomcat, which is why it is self-contained and why it is 19 MB. Article 4 opens it up and explains how that works.
The startup log is identical except for one detail, and it is worth noticing:
Starting DemoApplication v0.0.1-SNAPSHOT using Java 21.0.6 with PID 14061 (/Users/you/demo/build/libs/demo-0.0.1-SNAPSHOT.jar started by you in /Users/you/demo)Run from the jar, Boot can read the version out of the jar manifest and prints v0.0.1-SNAPSHOT. Run from bootRun, it is running loose class files and has no version to report.
Your first endpoint
The generated project answers every URL with a 404, because it has no controllers:
$ curl -s -i http://localhost:8080/
HTTP/1.1 404
Content-Type: application/json
Transfer-Encoding: chunked

{"timestamp":"2026-09-11T03:08:56.159Z","status":404,"error":"Not Found","path":"/"}
That JSON body is itself a good sign: the server is up and answering, and its default error handler is working. Now give it something to answer with. Create src/main/java/com/example/demo/HelloController.java, next to DemoApplication.java:
package com.example.demo;

import org.springframework.web.bind.annotation.GetMapping;
import org.springframework.web.bind.annotation.RequestParam;
import org.springframework.web.bind.annotation.RestController;

@RestController
public class HelloController {

    public record Greeting(String message, String recipient, int id) {}

    @GetMapping("/hello")
    public String hello() {
        return "Hello, Spring Boot!";
    }

    @GetMapping("/greeting")
    public Greeting greeting(@RequestParam(defaultValue = "World") String name) {
        return new Greeting("Hello, " + name + "!", name, 1);
    }
}
Three annotations and nothing else. @RestController says this class handles HTTP requests and its return values are response bodies rather than view names. @GetMapping("/hello") maps GET requests for that path onto that method. @RequestParam binds a query-string parameter to an argument.
Restart and call it:
$ curl -s -i http://localhost:8080/hello
HTTP/1.1 200
Content-Type: text/plain;charset=UTF-8
Content-Length: 19

Hello, Spring Boot!
The second endpoint returns an object rather than a string, and that changes the response:
$ curl -s -i http://localhost:8080/greeting
HTTP/1.1 200
Content-Type: application/json
Content-Length: 54

{"message":"Hello, World!","recipient":"World","id":1}

$ curl -s "http://localhost:8080/greeting?name=Hoang"
{"message":"Hello, Hoang!","recipient":"Hoang","id":1}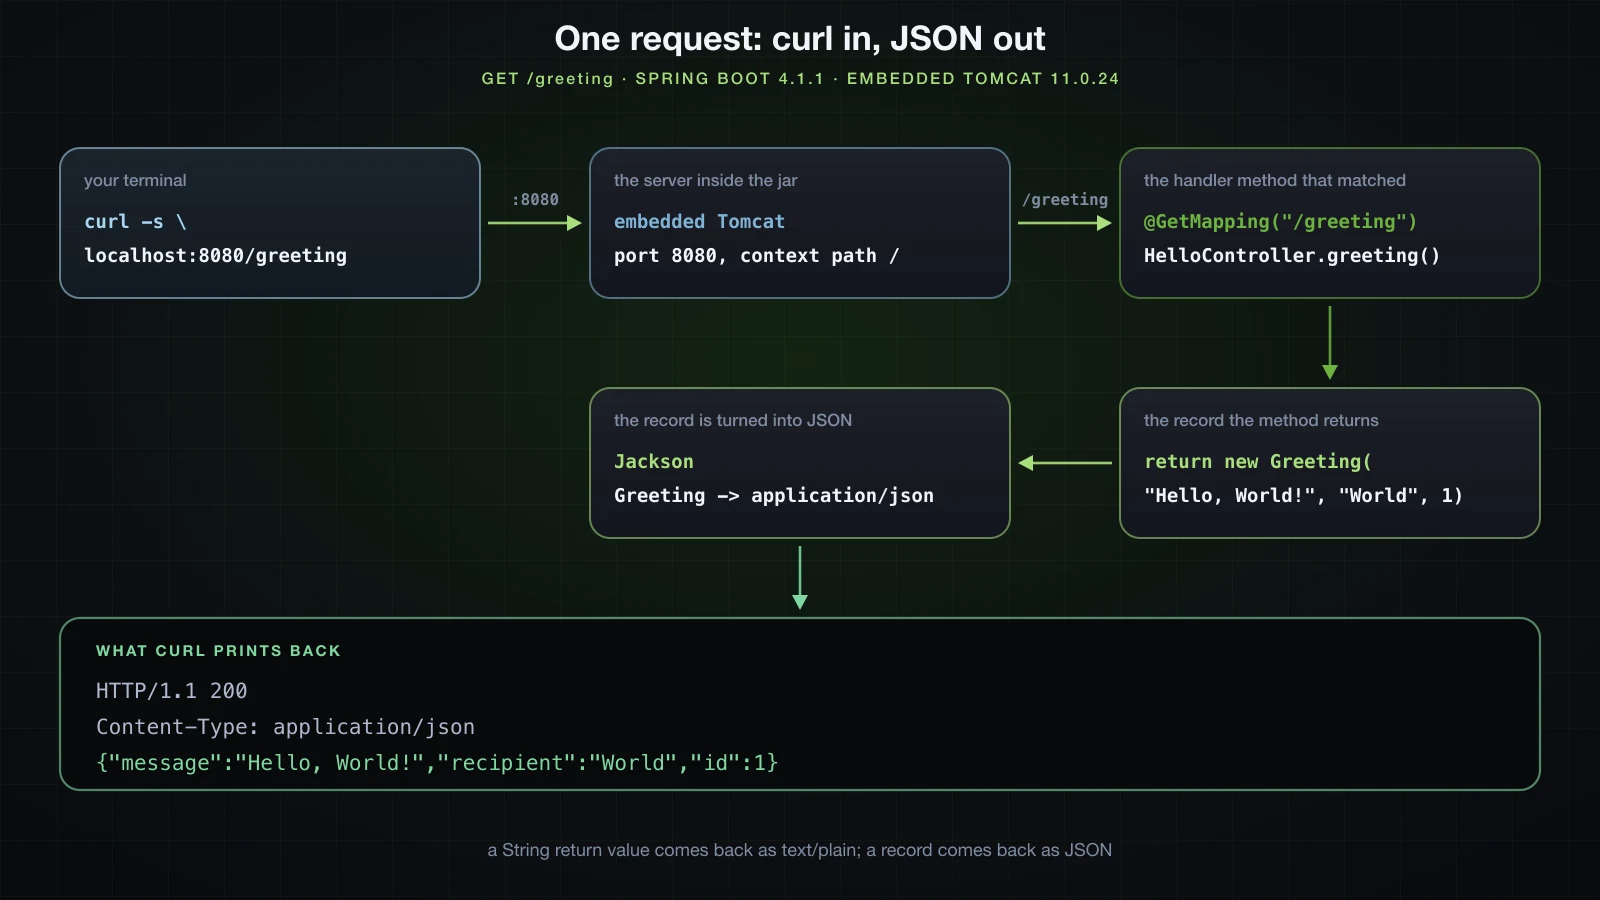
You wrote no JSON, no serialisation code and no content-type header. A String came back as text/plain; a record came back as application/json with one key per record component, in declaration order. Jackson is on the classpath — version 3.1.5, pulled in transitively by the web starter — and Boot configured it because it was there. That is the entire trick, and it is the whole reason the framework exists.
Changing the port
Either in src/main/resources/application.properties:
server.port=9090Or on the command line:
java -jar build/libs/demo-0.0.1-SNAPSHOT.jar --server.port=9090The log confirms it took:
Tomcat started on port 9090 (http) with context path '/'Troubleshooting the errors you will actually hit
| Symptom | What it means | Fix |
|---|---|---|
Web server failed to start. Port 8080 was already in use. | another process — usually a copy of this app you forgot to stop — holds the port | stop it, or run on a different port |
UnsupportedClassVersionError ... class file version 65.0 | built with Java 21, being run by an older JVM | point JAVA_HOME at 21 and rerun |
Cannot find a Java installation ... matching: {languageVersion=21 | Gradle cannot find a JDK 21 anywhere to compile with | install JDK 21, or lower the toolchain in build.gradle |
bash: ./gradlew: Permission denied | the wrapper script lost its executable bit | chmod +x gradlew |
Plugin [id: 'org.springframework.boot', version: '4.1.1'] was not found | the first build could not reach the network | get online for one build, then it is cached |
| A new controller returns 404 | its package is outside the one that gets scanned | move it under com.example.demo |
Port 8080 already in use. Start a second instance while the first is running and Boot refuses, with an unusually helpful message:
***************************
APPLICATION FAILED TO START
***************************

Description:

Web server failed to start. Port 8080 was already in use.

Action:

Identify and stop the process that's listening on port 8080 or configure this application to listen on another port.
Find the culprit with lsof -ti tcp:8080 on macOS or Linux, or netstat -ano | findstr :8080 on Windows, and kill the process id it prints. It is almost always an earlier run of the same application that you started from the IDE and then forgot about.
The wrong Java version, at run time. Build with 21, run with 17, and the JVM refuses the class file before your code executes:
Exception in thread "main" java.lang.UnsupportedClassVersionError: com/example/demo/DemoApplication has been compiled by a more recent version of the Java Runtime (class file version 65.0), this version of the Java Runtime only recognizes class file versions up to 61.0Class file version 65 is Java 21 and 61 is Java 17; subtract 44 to get the Java version. The fix is JAVA_HOME, back in the first section.
The wrong Java version, at build time. The Gradle-specific form of the same problem: the build file asks for a toolchain of 21, and no JDK 21 can be found.
* What went wrong:
Could not determine the dependencies of task ':bootJar'.
> Could not resolve all dependencies for configuration ':runtimeClasspath'.
   > Failed to calculate the value of task ':compileJava' property 'javaCompiler'.
      > Cannot find a Java installation on your machine (Mac OS X 26.4.1 aarch64) matching: {languageVersion=21, vendor=any vendor, implementation=vendor-specific, nativeImageCapable=false}. Toolchain auto-provisioning is not enabled.
Install JDK 21 — Gradle will find it on the standard paths without being told. The equivalent failure outside Gradle's toolchain mechanism is javac itself refusing the target:
$ javac -source 21 -target 21 Foo.java
error: invalid source release: 21

$ javac --release 21 Foo.java
error: release version 21 not supported
gradlew: Permission denied. The wrapper is a shell script, and some ways of moving a project around — an unzip tool that drops permissions, a checkout on a filesystem without an executable bit, a copy from Windows — strip it:
$ ./gradlew --version
bash: ./gradlew: Permission deniedchmod +x gradlewOn Windows, use gradlew.bat and this never comes up.
No network on the first build. Every dependency, and Gradle itself, is downloaded once and then cached. Before that cache exists you must be online, and the failure mode depends on which download fails first. The wrapper failing to fetch Gradle:
Downloading https://services.gradle.org/distributions/gradle-9.7.1-bin.zip

Attempt 1/1 failed. Reason: services.gradle.invalid
Exception in thread "main" java.net.UnknownHostException: services.gradle.invalid
Or the build failing to fetch the Boot plugin:
* What went wrong:
Plugin [id: 'org.springframework.boot', version: '4.1.1'] was not found in any of the following sources:

- Gradle Core Plugins (plugin is not in 'org.gradle' namespace)
- Included Builds (No included builds contain this plugin)
- Plugin Repositories (could not resolve plugin artifact 'org.springframework.boot:org.springframework.boot.gradle.plugin:4.1.1')
Behind a corporate proxy, set systemProp.https.proxyHost and systemProp.https.proxyPort in ~/.gradle/gradle.properties. Once a build has succeeded once, later builds work offline.
A controller that answers 404. You added @RestController, the application starts cleanly, and the URL still 404s. Put the class in a package outside com.example.demo and you get exactly this:
$ curl -s -i http://localhost:8080/outside
HTTP/1.1 404
Content-Type: application/json

{"timestamp":"2026-09-11T03:12:48.399Z","status":404,"error":"Not Found","path":"/outside"}
The class is compiled and packaged; it is simply never looked at. Component scanning starts from the package of the class annotated with @SpringBootApplication and only goes downwards, so com.example.other is invisible to a project rooted at com.example.demo. Move the class under the root package. Article 4 explains the rule properly.
FAQ
Do I need to install Maven or Gradle to build a Spring Boot project?
No. The generated project includes a wrapper — gradlew / gradlew.bat, or mvnw / mvnw.cmd for a Maven project — which downloads the exact build-tool version the project was created with. Always run ./gradlew, never gradle, so that everyone building the project uses the same version.
Which Java version should I pick for Spring Boot 4?
- Boot 4 requires 17 as a minimum and Initializr still defaults to 17, but 21 is the current LTS release and is offered on the same form. Change the field before you press Generate; changing it afterwards means editing
build.gradleand re-importing the project.
Why does the generated build file say spring-boot-starter-webmvc and not spring-boot-starter-web?
Because Boot 4 renamed it. Ticking "Spring Web" produces spring-boot-starter-webmvc, and the matching test starter is spring-boot-starter-webmvc-test. Tutorials written for Boot 3 and earlier show the old names. Keep the generated names and change the tutorial, not the other way round.
Is IntelliJ IDEA Community enough for Spring Boot?
The question is now out of date: since 2025.3, IntelliJ IDEA is a single product rather than two editions, and the free tier includes a Spring Boot project wizard, Gradle, the debugger, and basic Spring highlighting. That covers everything in this article. JetBrains' documentation still states that "Spring support is limited in IntelliJ IDEA without the Ultimate subscription", which is about the deeper Spring-aware navigation and editor support, not about being able to build and run.
What is the difference between demo-0.0.1-SNAPSHOT.jar and demo-0.0.1-SNAPSHOT-plain.jar?
The plain jar contains only your compiled classes, a few kilobytes of them. The other one contains your classes plus every dependency plus the embedded Tomcat, which is why it is around 19 MB and why it runs standalone with java -jar. Run the big one.
Why does my application start and then exit immediately?
Almost always a missing web starter. Swap spring-boot-starter-webmvc for the plain spring-boot-starter and the run is three log lines long — banner, Starting DemoApplication, Started DemoApplication in 0.229 seconds — with no Tomcat started on port 8080 between them, and then the JVM exits. That is correct behaviour for a non-web application: nothing is listening on a socket, so nothing keeps the process alive. Check that the web starter is in build.gradle and that you re-imported the project after adding it.
Conclusion
You now have a JDK that the terminal and the build tool agree on, a project generated by Spring Initializr with the fields chosen deliberately rather than accepted by default, an application that starts in under a second, and two endpoints — one returning text, one returning JSON that you never wrote a line of serialisation code for. The startup log is no longer a wall of text: you can point at the line where the beans were built and the line where the port was bound, and you know which two lines only appear after the first request arrives.
The next article opens up what the generator wrote: the project structure and the build tools — Gradle and Maven — what a starter dependency actually is, what @SpringBootApplication decomposes into, and what is inside that 19 MB executable JAR.
![[Spring Boot Basics] Logging in Spring Boot: SLF4J, Logback, Log Levels and Log Files](/images/blog/sb-logging-thumbnail.en.webp)
![[Spring Boot Basics] Validation in Spring Boot: Bean Validation Annotations, @Valid and Custom Validators](/images/blog/sb-validation-thumbnail.en.webp)
![[Spring Boot Basics] Server-Side Rendering with Thymeleaf in Spring Boot: Templates, Forms and Validation](/images/blog/sb-thymeleaf-thumbnail.en.webp)
![[Spring Boot Basics] API Documentation in Spring Boot with springdoc-openapi and Swagger UI](/images/blog/sb-springdoc-thumbnail.en.webp)