In the modern web development world, building a powerful, feature-rich Next.js application is not enough. To ensure your app is stable, reliable, and maintainable in the long run, testing is the essential "golden key" you can't ignore. 🔑

This article will guide you from the most basic concepts to confidently setting up and writing different types of tests for your Next.js project. Whether you're a beginner or an experienced developer, let's explore the fascinating world of testing together!
Why is Testing So Important? 🤔
Imagine you just launched a new feature for your e-commerce site. A few hours later, customers complain they can't add products to their cart. Revenue drops, your reputation suffers, and you have to stay up late to find and fix the bug. This is the nightmare that testing helps us prevent.
Testing in Next.js brings invaluable benefits:
- Early bug detection: Find and fix bugs during development, saving time and cost.
- Confidence when refactoring: You can safely improve and optimize code without worrying about breaking existing features. Your test suite acts as a "safety net."
- Better software architecture: Writing testable code often leads to cleaner, more modular, and understandable architecture.
- Living documentation: Test cases precisely describe how a component or function should work, becoming a valuable resource for new developers.
- Ensured user experience: Helps your app run smoothly and as expected, retaining users and boosting product credibility.
Common Types of Testing in Next.js
In Next.js, we usually focus on three main types of testing, forming a solid "testing pyramid."
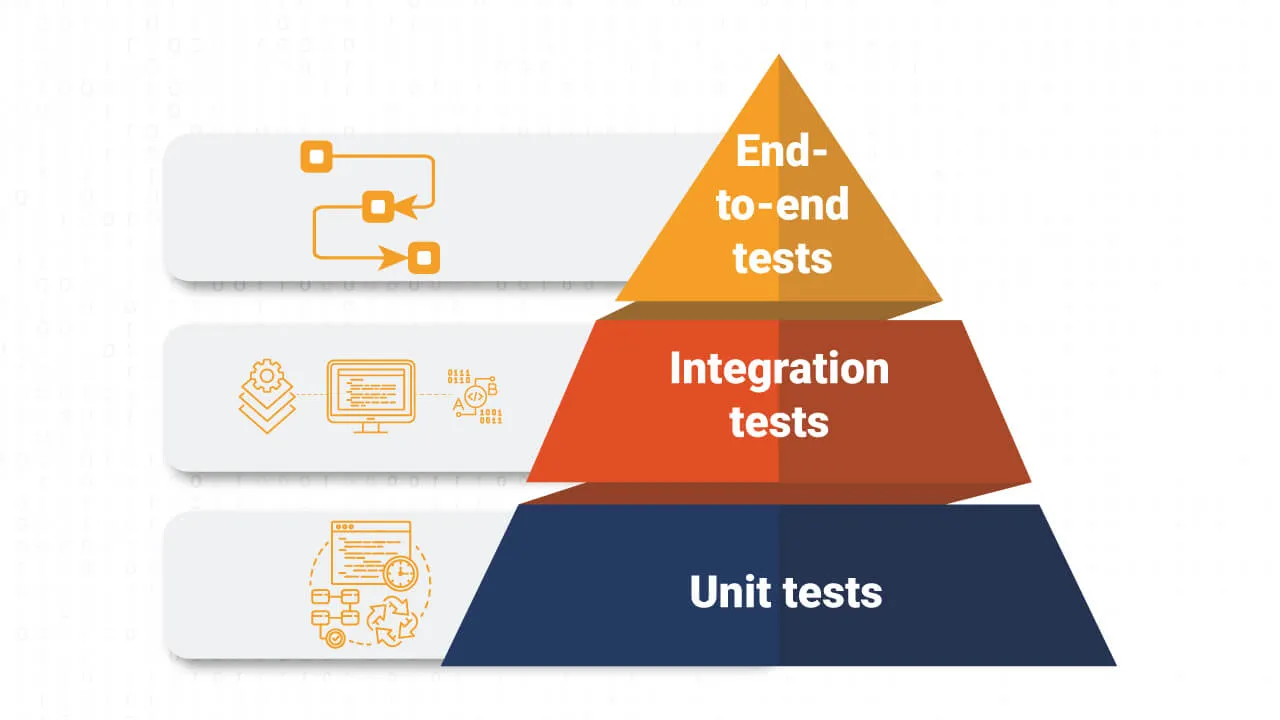
1. Unit Testing
This is the foundation of the pyramid. Unit tests focus on checking the smallest units of code in isolation, such as a component, utility function, or hook. The goal is to ensure each "building block" works correctly.
- Popular tools: Jest and React Testing Library (RTL). Jest provides a powerful testing environment (test runner, assertion library, mocking), while RTL helps you test React components the way users interact with them.
2. Integration Testing
A step up, integration tests check the interaction and cooperation between multiple units of code. For example, you might test a complete page to see if child components communicate correctly and display data from APIs accurately.
- Popular tools: Still Jest and React Testing Library. This combination is strong enough to simulate more complex interactions between components.
3. End-to-End (E2E) Testing
This is the top of the pyramid. E2E tests automate a real browser to check the entire workflow of your app from the user's perspective. For example, an E2E scenario could be: open the homepage, search for a product, add it to the cart, and proceed to checkout.
- Popular tools: Cypress and Playwright. These specialized tools let you write test scripts that simulate user behavior in a powerful and visual way.
Getting Started: Setting Up the Testing Environment
Next.js has built-in support for Jest, making setup very straightforward.
Step 1: Install Required Libraries
Open your terminal in your Next.js project folder and run:
npm install --save-dev jest jest-environment-jsdom @testing-library/react @testing-library/jest-dom
Step 2: Configure Jest
Create a jest.config.js file in your project root with the following content:
const nextJest = require('next/jest')

const createJestConfig = nextJest({
  // Provide the path to your Next.js app to load env files and config
  dir: './',
})

// Add any custom Jest config here
const customJestConfig = {
  setupFilesAfterEnv: ['<rootDir>/jest.setup.js'],
  testEnvironment: 'jest-environment-jsdom',
  moduleNameMapper: {
    // Handle path aliases '@/*' from tsconfig.json
    '^@/components/(.*)$': '<rootDir>/components/$1',
    '^@/pages/(.*)$': '<rootDir>/pages/$1',
  },
}

module.exports = createJestConfig(customJestConfig)
Step 3: Create Jest Setup File
This file is used to import helper libraries for Jest, such as @testing-library/jest-dom for handy assertions like toBeInTheDocument().
Create jest.setup.js in your project root:
// jest.setup.js
import '@testing-library/jest-dom'
Step 4: Add Scripts to package.json
Open your package.json and add the test script:
"scripts": {
  "dev": "next dev",
  "build": "next build",
  "start": "next start",
  "lint": "next lint",
  "test": "jest",
  "test:watch": "jest --watch"
}
Now you can run npm test to start Jest.
Write Your First Test Case ✍️
Let's start by testing a simple component.
Example 1: Unit Test for a Button Component
Suppose you have a Button component in components/Button.js:
// components/Button.js
export default function Button({ children, onClick }) {
  return <button onClick={onClick}>{children}</button>
}
Now, create a test file. Usually, we create a __tests__ folder or place the test file next to the component file.
Create components/Button.test.js:
import { render, screen, fireEvent } from '@testing-library/react'
import Button from './Button'

describe('Button Component', () => {
  // Test case 1: Check if Button displays correct text
  it('renders a button with the correct text', () => {
    render(<Button>Click me</Button>)

    // Find button with text "Click me"
    const buttonElement = screen.getByText(/Click me/i)

    // Assert that the button is in the DOM
    expect(buttonElement).toBeInTheDocument()
  })

  // Test case 2: Check if onClick handler is called when clicked
  it('calls onClick handler when clicked', () => {
    // Create a mock function
    const handleClick = jest.fn()

    render(<Button onClick={handleClick}>Click me</Button>)

    const buttonElement = screen.getByText(/Click me/i)

    // Simulate user click
    fireEvent.click(buttonElement)

    // Assert that the mock function was called once
    expect(handleClick).toHaveBeenCalledTimes(1)
  })
})
Run npm test and you'll see a "PASS" result. Congratulations, you've written your first unit test!
Example 2: Integration Test for a HomePage
Suppose your homepage (pages/index.js) displays a heading and a button to navigate.
// pages/index.js
import Link from 'next/link'

export default function HomePage() {
  return (
    <div>
      <h1>Welcome to our Website</h1>
      <Link href="/about">
        <a>Go to About Page</a>
      </Link>
    </div>
  )
}
Test file pages/index.test.js:
import { render, screen } from '@testing-library/react'
import HomePage from './index'

describe('HomePage', () => {
  it('renders a heading and a link', () => {
    render(<HomePage />)

    // Check heading
    const heading = screen.getByRole('heading', {
      name: /welcome to our website/i,
    })
    expect(heading).toBeInTheDocument()

    // Check link
    const link = screen.getByRole('link', {
      name: /go to about page/i,
    })
    expect(link).toBeInTheDocument()
    expect(link).toHaveAttribute('href', '/about')
  })
})
This test ensures that the homepage components not only render but are also correctly linked together.
Mastering E2E Testing with Cypress
While Jest and RTL are great for unit and integration tests, Cypress is the "king" of E2E testing.
Setup Cypress
- Install:
npm install --save-dev cypress - Open Cypress:
npx cypress open
On first run, Cypress will automatically create a folder structure (cypress/) with example files.
Write a Simple E2E Scenario
Let's write a test to ensure users can navigate from the homepage to the "About" page.
Create cypress/e2e/navigation.cy.js:
describe('Navigation', () => {
  it('should navigate to the about page', () => {
    // 1. Start from the homepage
    cy.visit('http://localhost:3000/')

    // 2. Find the link containing "About" and click it
    cy.get('a[href*="about"]').click()

    // 3. The new URL should include "/about"
    cy.url().should('include', '/about')

    // 4. The new page should have an h1 with "About Page"
    cy.get('h1').contains('About Page')
  })
})
To run this test, start your Next.js dev server (npm run dev) in one terminal, and run npx cypress open in another, then select the navigation.cy.js test file to see Cypress execute the scenario visually.
Best Practices - Golden Tips
If you're ready to apply testing to your Next.js project, here are some helpful tips:
- Test behavior, not implementation details: Don't test component
stateorprops. Test that for a given input, the component produces the correct output (UI) as seen by the user. React Testing Library is designed to encourage this. - Write readable tests: Name your test cases clearly by scenario:
it('should do X when Y happens'). - Keep tests independent: Each test case should not depend on the result of another.
- Balance test types: Focus on writing more unit tests, fewer integration tests, and only a few important E2E tests for main flows. Don't overuse E2E tests as they're slow and harder to maintain.
- Integrate into CI/CD: Run tests automatically whenever new code is pushed (e.g., using GitHub Actions) to ensure no bugs slip through.
Conclusion: Testing is Not a Chore
Testing is not a boring task or a burden. It's a smart investment in your project's future. By applying Jest, React Testing Library, and Cypress, you can build a solid defense system, making your Next.js app robust, reliable, and ready to grow.
Start writing tests today. It may feel unfamiliar at first, but as your test suite grows and saves you from unexpected bugs, you'll see how worthwhile it is. Good luck on your journey to mastering testing in Next.js!
![[Next.js Tutorial] The Complete Guide to Styling: Which Option is Best for You?](/images/blog/styling-in-nextjs.webp)
![[Next.js Tutorial] Layouts: A Detailed Guide to Optimizing Your Website UI](/images/blog/layouts-in-nextjs.webp)
![[Next.js Tutorial] Caching: The Secret to Making Your Website 10x Faster](/images/blog/caching-in-nextjs.webp)
![[Next.js Tutorial] A Simple and Effective Guide to Deploying Your Next.js App](/images/blog/deploy-nextjs-app.webp)