In modern web development, speed is no longer optional—it’s a requirement. Users expect lightning-fast websites, and search engines favor high-performance sites. Next.js, as one of the leading React frameworks, provides a powerful and sophisticated caching system to solve this challenge.

But how exactly does caching work in Next.js? What types are there, and when should you use them? This article will decode every layer of caching in Next.js, helping you master this "superpower" to build faster, more efficient, and cost-effective web apps.
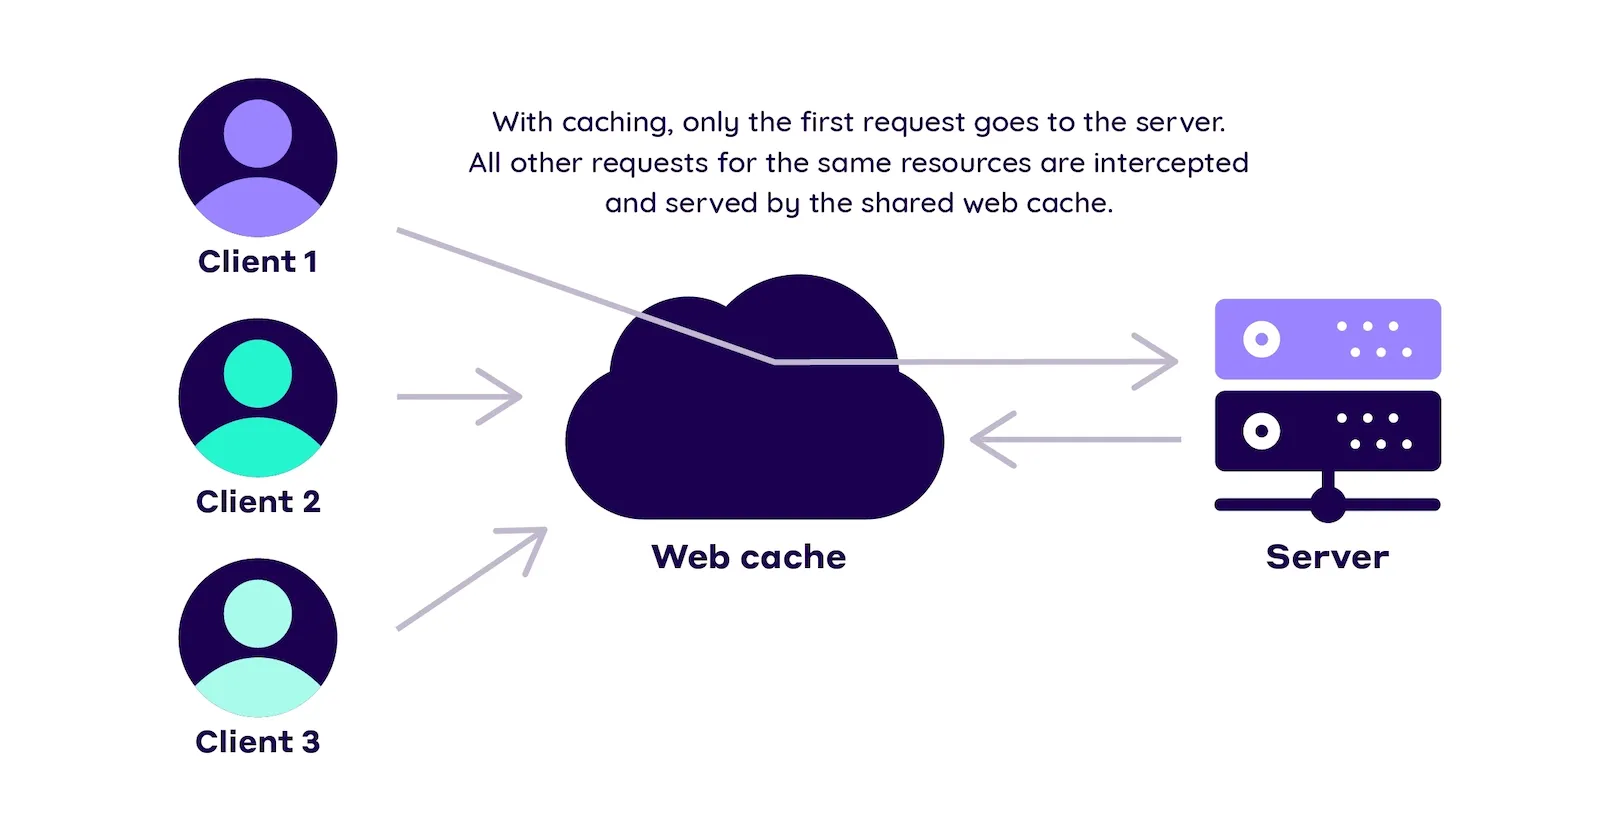
Why is Caching So Important? 🤔
Before diving into the techniques, let’s look at why caching is a core concept in Next.js and web development in general.
- ⚡ Faster page loads: Instead of recalculating or fetching data from the server for every request, caching lets you store the results. On new requests, the system simply returns the saved copy, dramatically reducing latency.
- 📉 Reduced server and database load: By serving content from cache, you reduce the number of requests your server, API, or database must handle. This not only improves scalability but also saves on resource costs.
- ✨ Better user experience (UX): Fast websites provide smooth experiences, keep users engaged, and increase conversion rates.
- 🔎 Improved SEO: Page speed is a key Google ranking factor. Faster sites have a better chance of ranking higher in search results.
Next.js has caching built into its core architecture—especially with the App Router—making it automatic and smart.
The Main Caching Layers in Next.js
With the App Router, Next.js introduces a multi-layered caching model, working together to optimize performance at every level. Think of it as an efficient assembly line, where each stage has its own storage to speed up the whole process.
1. Request Memoization (Temporary Request Storage)
This is the shortest-lived cache layer, existing only for the duration of a single server request.
- How it works: When you use
fetchin multiple Server Components within the same component tree, with the same URL and options, Next.js will only make thatfetchonce. Subsequent calls reuse the in-memory result. - Benefit: Prevents redundant API calls for the same data across different components during a single page render, reducing unnecessary network requests.
- Note: This only applies to
fetch, not to other data-fetching libraries like Axios. React also provides acachefunction to apply similar memoization to your own functions.
2. Data Cache
This is a more persistent cache layer, surviving across user requests and even deployments. The Data Cache stores results from external data sources (APIs, CMS, databases).
- How it works: When you call
fetchin a Server Component, its result is automatically stored in the Data Cache on the Next.js server.// app/page.js async function getPosts() { const res = await fetch('https://api.example.com/posts') // Result is auto-cached return res.json() } - Cache control: You can customize
fetchcaching with thenext.revalidateorcacheoptions.- Default cache (force-cache):
fetch('...')– Data is cached indefinitely (or until you redeploy). - No cache (no-store):
fetch('...', { cache: 'no-store' })– Data is always freshly fetched. Equivalent togetServerSidePropsin the Pages Router. - Time-based revalidation (ISR):
fetch('...', { next: { revalidate: 60 } })– Data is cached and refreshed every 60 seconds.
- Default cache (force-cache):
3. Full Route Cache
This is the most powerful cache layer, delivering the highest performance. Next.js automatically renders Server Components and stores the entire HTML and React Server Component Payload (RSC Payload) in the cache.
- How it works: At build time or during revalidation, Next.js pre-renders your routes. The final result (HTML + RSC Payload) is stored on the server or at the Edge (e.g., Vercel).
- Benefit: When users visit a cached route, the server doesn’t need to render anything—it just sends the pre-built HTML/RSC. This is the essence of Static Site Generation (SSG), but even more flexible.
- Automatic: As long as you use
fetchwith caching (the default), your routes are automatically included in the Full Route Cache. If you use dynamic functions likeheaders(),cookies(), orfetchwithcache: 'no-store', that route becomes dynamic and is not cached at this layer.
4. Router Cache (Client-side Cache)
This cache layer works entirely in the user’s browser.
- How it works: The Router Cache stores the RSC Payload of routes the user has visited. When navigating between pages with
<Link>, Next.js doesn’t need to make a new server request if the page’s payload is already cached in the browser. It simply renders instantly from memory. - Benefit: Creates nearly instant, ultra-smooth navigation.
- Invalidation: The Router Cache is refreshed after a certain time (a few minutes for dynamic routes, longer for static ones) or when the user refreshes the page.
Caching and Revalidation Strategies
Understanding the cache layers is one thing, but using them effectively is another. Next.js provides two main strategies to keep your data up-to-date.
1. Time-based Revalidation (ISR)
The classic approach: specify a time interval (in seconds), after which data is considered "stale" and should be refreshed.
-
How to use: Use the
revalidateoption infetchor in the Route Segment config.// In fetch fetch('https://...', { next: { revalidate: 3600 } }) // Refresh every hour // In page.js or layout.js export const revalidate = 60 // Refresh the whole route every 60 seconds -
When to use: Great for data that doesn’t need real-time updates but should be refreshed periodically, like blogs, product lists, or news.
2. On-demand Revalidation
A modern, more efficient approach—let you refresh the cache on demand when data changes.
-
How to use: Trigger revalidation by "tag" or "path".
-
Tag-based revalidation: Attach one or more tags to a
fetch. Then, callrevalidateTag('tag-name')(usually in an API route or Server Action) to refresh all data with that tag.// Fetch data and attach a tag fetch('https://.../products', { next: { tags: ['products'] } }) // API Route to revalidate (e.g., api/revalidate) import { revalidateTag } from 'next/cache' // ... revalidateTag('products') -
Path-based revalidation: Similarly, you can refresh a specific path with
revalidatePath('/blog/post-1').
-
-
When to use: Extremely useful when you want data to update instantly after an action—like a user creating a new post, updating product info, or a CMS webhook firing.
Caching Comparison: App Router vs. Pages Router
If you’re used to the Pages Router, the App Router’s caching model brings some notable changes.
| Feature | Pages Router | App Router | Notes |
|---|---|---|---|
| Static data fetching | getStaticProps | fetch(...) (default) | App Router automates SSG. |
| Time-based revalidate | revalidate in getStaticProps | revalidate in fetch or export const revalidate | ISR is more flexible and granular. |
| Dynamic data fetching | getServerSideProps | fetch(..., { cache: 'no-store' }) or dynamic functions | SSR is fully supported. |
| On-demand revalidate | res.revalidate() | revalidateTag() / revalidatePath() | App Router offers a more powerful tag-based approach. |
| Client-side Caching | Manual (SWR, React Query) | Router Cache (built-in) | App Router has built-in client-side navigation caching. |
Conclusion: Master Caching, Master Performance
Next.js’s caching system—especially with the App Router—is an engineering masterpiece designed to deliver maximum performance with minimal developer effort. By understanding each cache layer—from temporary Request Memoization, persistent Data Cache, powerful Full Route Cache, to client-side Router Cache—you can build apps that are not only fast, but also scalable and cost-effective.
Start by letting Next.js automatically cache everything it can. Then, fine-tune your strategy with Time-based and On-demand Revalidation to balance performance and data freshness. Mastering these tools will take your Next.js skills to the next level. Good luck!
![[Next.js Tutorial] Layouts: A Detailed Guide to Optimizing Your Website UI](/images/blog/layouts-in-nextjs.webp)
![[Next.js Tutorial] Testing: The Complete Guide to Unit, Integration, and E2E Testing](/images/blog/testing-in-nextjs.webp)
![[Next.js Tutorial] Implementing Authentication for Enhanced Website Security](/images/blog/authentication-in-nextjs.webp)
![[Next.js Tutorial] Data Fetching in Server Components: How to Optimize Effectively](/images/blog/data-fetching-with-server-components-in-nextjs.webp)