You have a JDK installed. The next decision is which editor drives it. Java is unusual here: the compiler is a separate program from the editor, so an editor that knows nothing about javac gives you no type checking, no autocomplete and no way to jump to a definition until you run a build and read the errors.
An IDE closes that gap by keeping its own compiler running against your source as you type. This article compares the three IDEs people actually use, installs them, creates a first project in IntelliJ IDEA, explains every directory the wizard produces, and works through the setup errors that stop beginners on day one.
The examples use Java 21.
Why use an IDE for Java?
You can learn Java with a text editor and javac alone, and a later article in this series does exactly that so you can see what the IDE is doing on your behalf. Nobody works that way professionally, for four concrete reasons:
- Incremental compilation. The IDE compiles in the background after every edit, so a typo is underlined in red about a second after you type it instead of after a full build.
- Type-aware autocomplete. Java's standard library is enormous and its names are long. Autocomplete that knows the static type of the expression under the caret turns
list.into a filtered menu of whatList<String>can do. - Refactoring. Renaming a class in a text editor is find-and-replace, which will happily rename a string literal. Renaming in an IDE rewrites every reference, the file name and the imports, and nothing else.
- The debugger. Attaching a debugger by hand means passing
-agentlib:jdwp=...to the JVM and driving a wire protocol. The IDE reduces that to clicking in the gutter.
None of that is Java-specific in principle. It matters more in Java than in a scripting language because the compiler is the thing that tells you whether the program is correct, and the compiler is not in your editor unless you put it there.
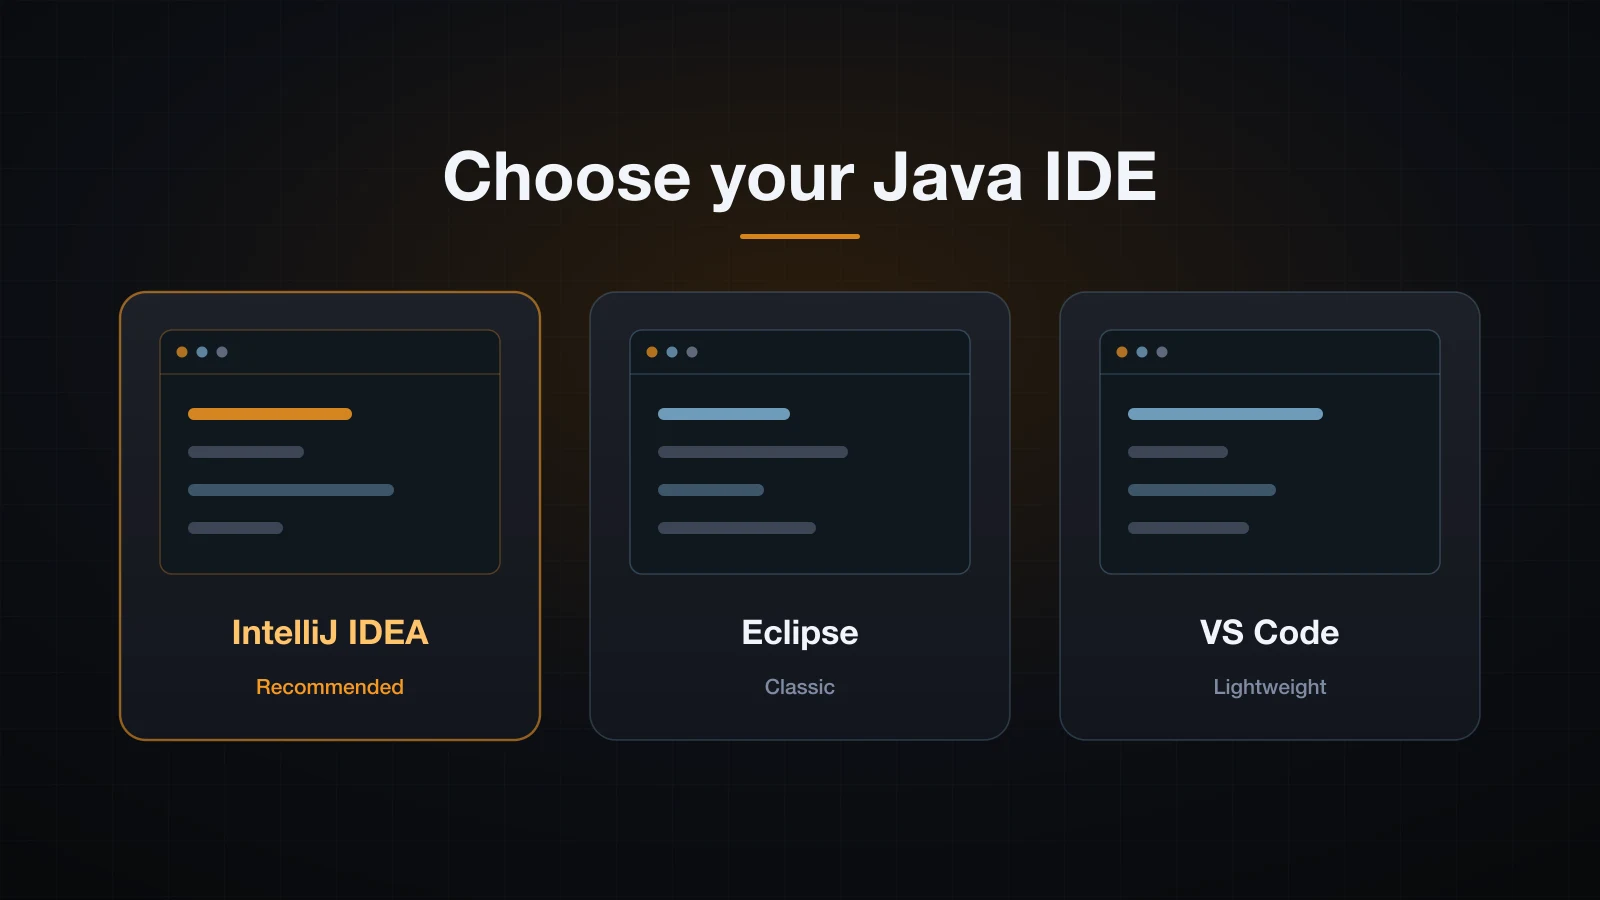
Which Java IDE should you use?
| IntelliJ IDEA Community | IntelliJ IDEA Ultimate | Eclipse IDE | VS Code + Extension Pack for Java | |
|---|---|---|---|---|
| Price | Free, Apache 2.0 | Paid subscription; free trial, free for students and OSS projects | Free, EPL 2.0 | Free |
| Memory footprint | Heavy — a JVM hosting the whole IDE | Heavy, slightly above Community | Moderate | Lightest editor, but the Java language server is a second JVM process |
| Indexing speed | Slow full index on first open, then very fast | Same as Community | No long global index; incremental builder starts quickly | Background indexing; the first main may take a while to become runnable |
| Spring / Jakarta support | None built in | First-class: Spring, Jakarta EE, JPA, HTTP client | Via plugins (Spring Tools 4, Eclipse Web Tools) | Via extra extensions (Spring Boot Extension Pack) |
| Maven / Gradle | Both built in, imports an existing project on open | Both built in | Maven via m2e (bundled), Gradle via Buildship | Both via the bundled Maven and Gradle extensions |
| Suits a beginner | Best — the clearest wizard, the most explicit inspections | Fine, but you do not need any of it yet | Workable; the workspace model and the older UI cost you time | Good if VS Code is already your editor; the weakest refactoring of the three |
Use IntelliJ IDEA Community Edition. It costs nothing, it needs no plugin decisions before you can create a project, and its inspection messages explain the problem rather than just flagging it — which is the whole value of an IDE while you are still learning the language.
Apache NetBeans is the fourth option and is genuinely fine — free, Apache 2.0, strong Maven and Gradle support, and a good Swing GUI builder if you ever want one. It is a footnote here only because its community is much smaller, so when you paste an error into a search engine you will find IntelliJ and Eclipse answers.
Installing IntelliJ IDEA, Eclipse and VS Code
Install one. The other two are here so you can follow a colleague's screen later.
IntelliJ IDEA: direct download or JetBrains Toolbox
Two routes:
- Direct download from the JetBrains site. Pick the Community Edition build for your OS and CPU — on Apple silicon take the aarch64 build, not the Intel one, or the IDE runs under emulation and feels slow. On Windows the
.exeinstaller offers to add aPATHentry and file associations; both are optional. - JetBrains Toolbox App, a small launcher that installs, updates and rolls back every JetBrains IDE. Take this route if you expect to use more than one JetBrains product or want updates handled for you. It costs you one extra background process.
Neither route installs a JDK for you, but IntelliJ can download one from inside the New Project dialog if it does not find one.
Eclipse: the installer or the packaged download
Also two routes, and the difference matters more than with IntelliJ:
- The Eclipse Installer (
eclipse-inst) asks which flavour you want and then downloads it. Choose Eclipse IDE for Java Developers — the smallest package that has what you need. The other entries add C++, PHP or full Jakarta EE tooling you will not use. - The packaged download, a
.zip/.tar.gz/.dmgof that same flavour. Unpack it and run it. Nothing is written outside the folder, which makes it easy to keep two Eclipse versions side by side.
On first launch Eclipse asks for a workspace directory. That is not a project — see the Eclipse section further down.
VS Code: the Extension Pack for Java
VS Code has no Java support out of the box. Install the Extension Pack for Java (publisher: Microsoft), which is a bundle of six extensions:
| Extension | What it does |
|---|---|
| Language Support for Java™ by Red Hat | The language server: compilation, errors, completion, refactoring |
| Debugger for Java | Breakpoints, stepping, variable inspection |
| Test Runner for Java | Running and reporting JUnit and TestNG tests |
| Maven for Java | The Maven project view, lifecycle goals, archetypes |
| Project Manager for Java | The Java Projects view, source roots, referenced libraries |
| IntelliCode | Ranked completion suggestions |
⚠️ The Red Hat language server is itself a Java program and needs a JDK 17 or newer to run, separately from whatever JDK your project targets. If your only JDK is 11, the extension will not start. Point it at a modern JDK with the
java.jdt.ls.java.homesetting, and set your project's JDK separately injava.configuration.runtimes.
Creating your first project in IntelliJ IDEA
By menu path, from the welcome screen or from File | New | Project…:
- In the left column of the New Project dialog, choose New Project (the plain Java entry — not Maven Archetype, not Spring).
- Name:
demo. Location: wherever you keep code. IntelliJ creates<location>/demo. - Language: Java.
- Build system: IntelliJ, Maven, or Gradle. Pick IntelliJ.
- JDK: pick the JDK you installed. If the dropdown is empty, open it and choose Download JDK….
- Leave Add sample code ticked for now, and untick Create Git repository unless you want one.
- Create.
On the build system choice: IntelliJ means the IDE compiles the project itself with no build file, which is the right answer for a project that has no dependencies and never leaves your machine. Maven and Gradle add a build file (pom.xml or build.gradle) that declares dependencies and can build the project without an IDE — necessary the moment you add a third-party library or a CI pipeline, and worth switching to then rather than now.
With Add sample code ticked, IntelliJ writes a Main class with a main method that prints a greeting. The exact body changes between IntelliJ versions; the part that is always the same is the shape:
public class Main {
    public static void main(String[] args) {
        System.out.println("Hello, World!");
    }
}
What every token in that file means is the subject of the next article. For now it is just the thing the IDE generated so there is something to run.
What the project layout means
An IntelliJ-built Java project starts out minimal:
demo/
  .idea/          IDE configuration
  src/            source root — your .java files
  out/            compiled .class files
  demo.iml        the module definition
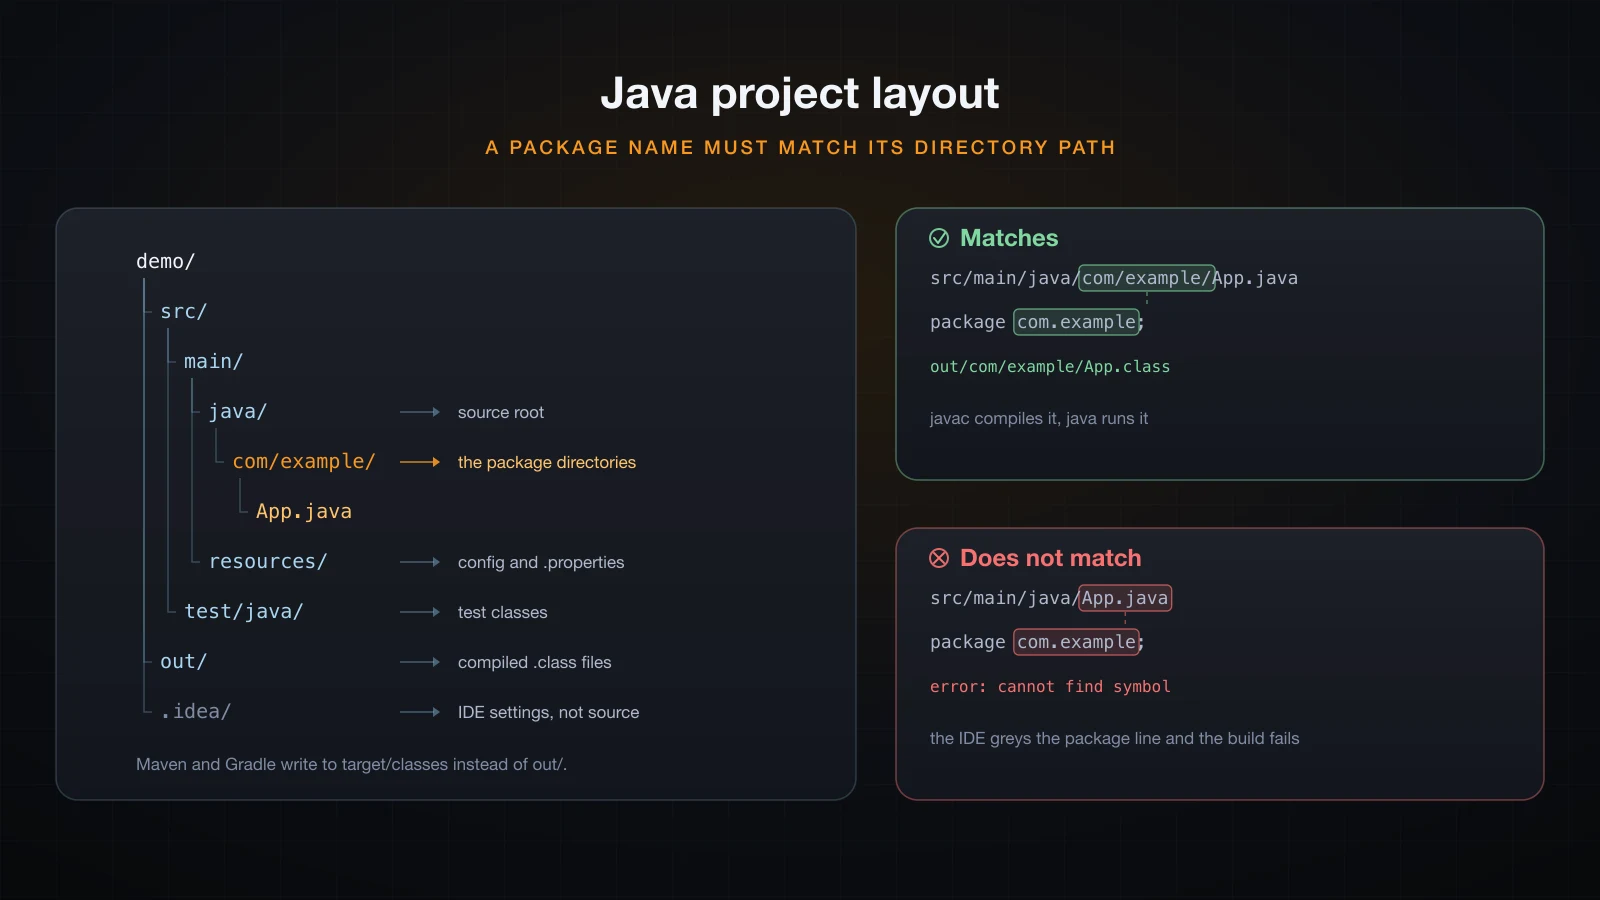
Choose Maven or Gradle instead and you get the layout that the rest of the Java world uses:
| Path | What lives there |
|---|---|
src/main/java | Production source. This is the source root: package names are relative to it. |
src/main/resources | Files the program reads at runtime — .properties, .json, templates. The build copies them next to the classes so they are on the classpath. |
src/test/java | Test classes. A separate source root, so tests can see production code but not the reverse. |
out/ or target/classes | Compiler output — one .class file per class, in directories mirroring the packages. Never edit, never commit. |
.idea/ | IntelliJ's own state: misc.xml (project SDK and language level), modules.xml, compiler.xml, and workspace.xml, which holds per-user UI state and should stay out of version control. |
That resources directory catches people out: the file must reach the classpath, not just the disk. If it never gets copied, getResourceAsStream returns null and you see this rather than a missing-file error:
Exception in thread "main" java.lang.NullPointerException: inStream parameter is nullThe rule that breaks everyone's first project
A class's package must match the directory path it sits in, relative to the source root. A file at src/main/java/com/example/App.java must start with package com.example;, and nothing else.
The compiler makes this concrete. Compiling the correct layout puts the class where the package says it goes:
javac -d out src/main/java/com/example/App.java
java -cp out com.example.AppHello, World!The -d out flag did not put the class in out/ — it rebuilt the package path underneath it:
out/com/example/App.classNow break it. Move Greeter.java up to the source root while it still declares package com.example;, and compile the class that uses it:
javac -d out -sourcepath src/main/java src/main/java/com/example/Main.javasrc/main/java/com/example/Main.java:5: error: cannot find symbol
System.out.println(Greeter.greet("World"));
^
symbol: variable Greeter
location: class Main
1 errorThe compiler looked for com.example.Greeter under src/main/java/com/example/, because that is where the package name says it must be, and did not find it. IntelliJ reports the same condition as Cannot resolve symbol 'Greeter', plus a warning on the package line itself.
Two related failures come from the same rule. A public class whose name does not match its file name is rejected outright:
src/main/java/com/example/Greeting.java:3: error: class Greeter is public, should be declared in a file named Greeter.java
public class Greeter {
       ^
1 error
And a compiled class run from the wrong classpath root fails at load time with a message that names the mismatch exactly:
java -cp out/com/example AppError: Could not find or load main class App
Caused by: java.lang.NoClassDefFoundError: App (wrong name: com/example/App)The class file remembers the package it was compiled with. Point the classpath at the directory that contains com/, never at the package directory itself.
Running the program
Open Main.java. A green triangle appears in the left gutter next to the class declaration and next to main. Click it and choose Run 'Main.main()'.
Three things happen. IntelliJ compiles the module to out/production/demo, it silently creates a run configuration named Main, and it opens the Run tool window at the bottom with the process output. The run configuration is now in the dropdown in the top-right toolbar, so subsequent runs are one click or one keystroke — you do not need the gutter again.
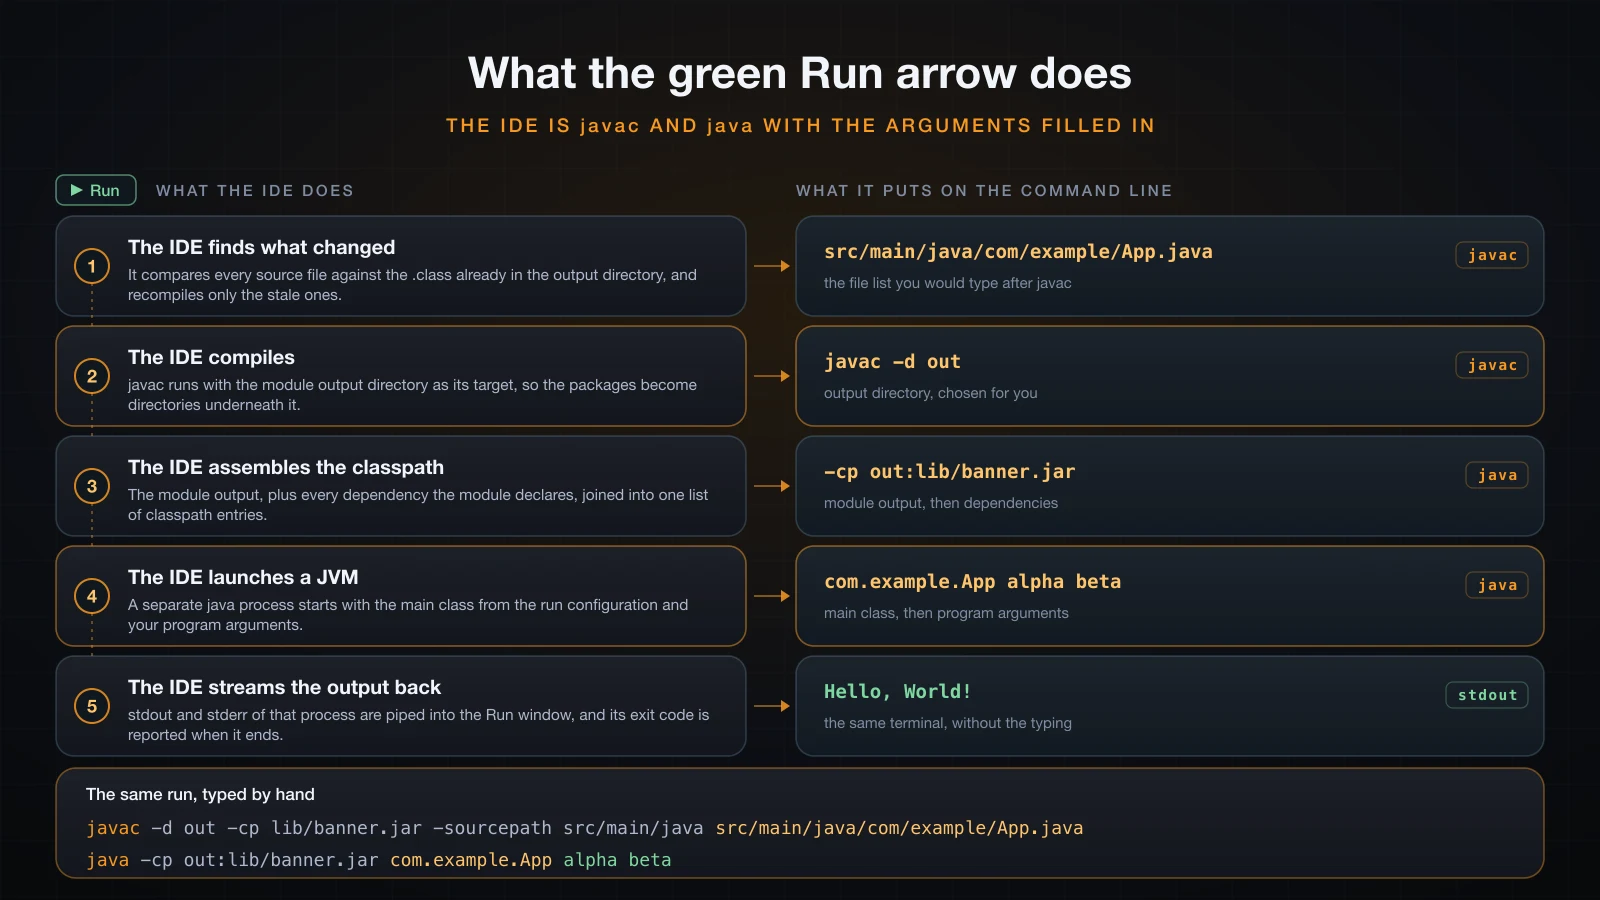
None of that is magic: every step maps onto an argument that a later article in this series types out to javac and java by hand.
The Run tool window shows the exact command line at the top, the program's System.out and System.err interleaved, and the exit code at the end:
Process finished with exit code 0A non-zero code or a stack trace means the program failed; a stack trace in that window is clickable, and each frame jumps to the line.
Program arguments
main(String[] args) receives whatever was passed on the command line. In the IDE that goes in the run configuration: Run | Edit Configurations…, select the Main configuration, and fill in Program arguments. Entering alpha beta produces the same thing as passing them to java:
java -cp out com.example.App alpha betaHello, World!
arg: alpha
arg: betaThe neighbouring VM options field is different: those go to the JVM (-Xmx512m, -D properties), not to your program.
Setting a breakpoint and stepping once
Click in the gutter on the line number of the System.out.println line — a red dot appears. Now start the same configuration with Debug rather than Run.
Execution stops before that line runs. The Debug tool window shows the call stack on the left and every variable in scope on the right, including args. Press F8 to step over one line and watch the output appear; F7 steps into a method call instead; F9 resumes until the next breakpoint. Remove the breakpoint by clicking the red dot again.
That is the whole loop, and it replaces most of the System.out.println debugging you would otherwise write.
Settings worth changing on day one
Open settings with Cmd+, on macOS or Ctrl+Alt+S on Windows and Linux.
| Setting | Where | Why |
|---|---|---|
| Editor font size | Editor → Font | The default is small on a large display; 14–16pt is a normal working size. |
| Add unambiguous imports on the fly | Editor → General → Auto Import | Typing List inserts import java.util.List; without a popup. Turn on Optimize imports on the fly next to it to drop unused ones. |
| Show whitespaces | Editor → General → Appearance | Makes a stray tab in a space-indented file visible instead of mysterious. |
| File encodings → UTF-8 | Editor → File Encodings | Set Global, Project and Default encoding for properties files to UTF-8, and tick Transparent native-to-ASCII conversion only if you must edit legacy .properties. |
| Code style | Editor → Code Style → Java | The default is the standard Java convention: 4 spaces, no tabs. Leave it, and reformat with Cmd+Alt+L / Ctrl+Alt+L before every commit. |
On encoding: since JDK 18, the JVM's default charset is UTF-8 regardless of platform (JEP 400). On the JDK 21 used for this article, a program prints:
file.encoding   = UTF-8
native.encoding = UTF-8
The IDE setting still matters, because it decides how the editor writes bytes to disk, and because javac on an older JDK reads source in the platform default charset unless you pass -encoding UTF-8.
IntelliJ shortcuts you should learn first
These are the defaults from the macOS and Windows keymaps.
| Action | macOS | Windows / Linux |
|---|---|---|
| Run the current configuration | Ctrl+R | Shift+F10 |
| Run whatever is under the caret | Ctrl+Shift+R | Ctrl+Shift+F10 |
| Debug the current configuration | Ctrl+D | Shift+F9 |
| Reformat code | Cmd+Alt+L | Ctrl+Alt+L |
| Optimize imports | Cmd+Alt+O | Ctrl+Alt+O |
| Rename (refactor) | Shift+F6 | Shift+F6 |
| Go to declaration | Cmd+B | Ctrl+B |
| Find usages | Alt+F7 | Alt+F7 |
| Search everywhere | Shift, Shift | Shift, Shift |
Generate (constructor, getters, toString) | Cmd+N | Alt+Insert |
| Comment / uncomment line | Cmd+/ | Ctrl+/ |
| Toggle breakpoint | Cmd+F8 | Ctrl+F8 |
| Settings | Cmd+, | Ctrl+Alt+S |
If you learn two, learn Search everywhere (double Shift — it finds classes, files, settings and actions from one box) and Generate, which writes the boilerplate Java is famous for.
The same steps in Eclipse and VS Code
Eclipse
Eclipse's central concept is the workspace: a directory holding your projects plus a .metadata/ folder of Eclipse's own settings. Preferences such as the formatter and the default JRE are per-workspace, not global, so switching workspaces switches settings. Keep one workspace for now.
File → New → Java Project. Give it a name, leave Use default location ticked, choose the JRE, and untick Create module-info.java file — module declarations are a complication you do not need yet. Eclipse creates src/ and bin/ plus two dotfiles, .project and .classpath, which are the Eclipse equivalents of .idea/.
The Package Explorer on the left is the project view; note it shows packages as flat names like com.example by default rather than as nested folders — the Package Presentation → Hierarchical option in its view menu changes that, and makes the directory structure much easier to see while the package rule is still new to you.
Right-click the class → Run As → Java Application, or Ctrl+F11. Useful defaults: Ctrl+Shift+F reformats, Alt+Shift+R renames, F3 opens a declaration, Ctrl+Shift+G finds references, Ctrl+Shift+R opens any file by name.
VS Code
VS Code opens folders, not projects. Open the folder that contains src/ — one level too high or too low and the language server will not recognise the source root. A folder with a pom.xml or build.gradle at the top is detected automatically; a plain folder is treated as an unmanaged project with src/ as the source root.
The Java Projects view in the Explorer sidebar lists source roots, referenced libraries and the JDK in use; the Create Java Project button there runs the closest equivalent of IntelliJ's wizard, asking for a project type (No build tools, Maven, Gradle) and a location.
Above every main method the extension renders a Run | Debug code lens. Clicking Run is equivalent to Ctrl+F5; Debug is F5 and stops at breakpoints set by clicking in the gutter. Format with Shift+Alt+F. When completions or errors do not update, run Java: Clean Java Language Server Workspace from the Command Palette — the VS Code equivalent of invalidating caches.
Troubleshooting the common setup errors
| Symptom | Cause | Fix |
|---|---|---|
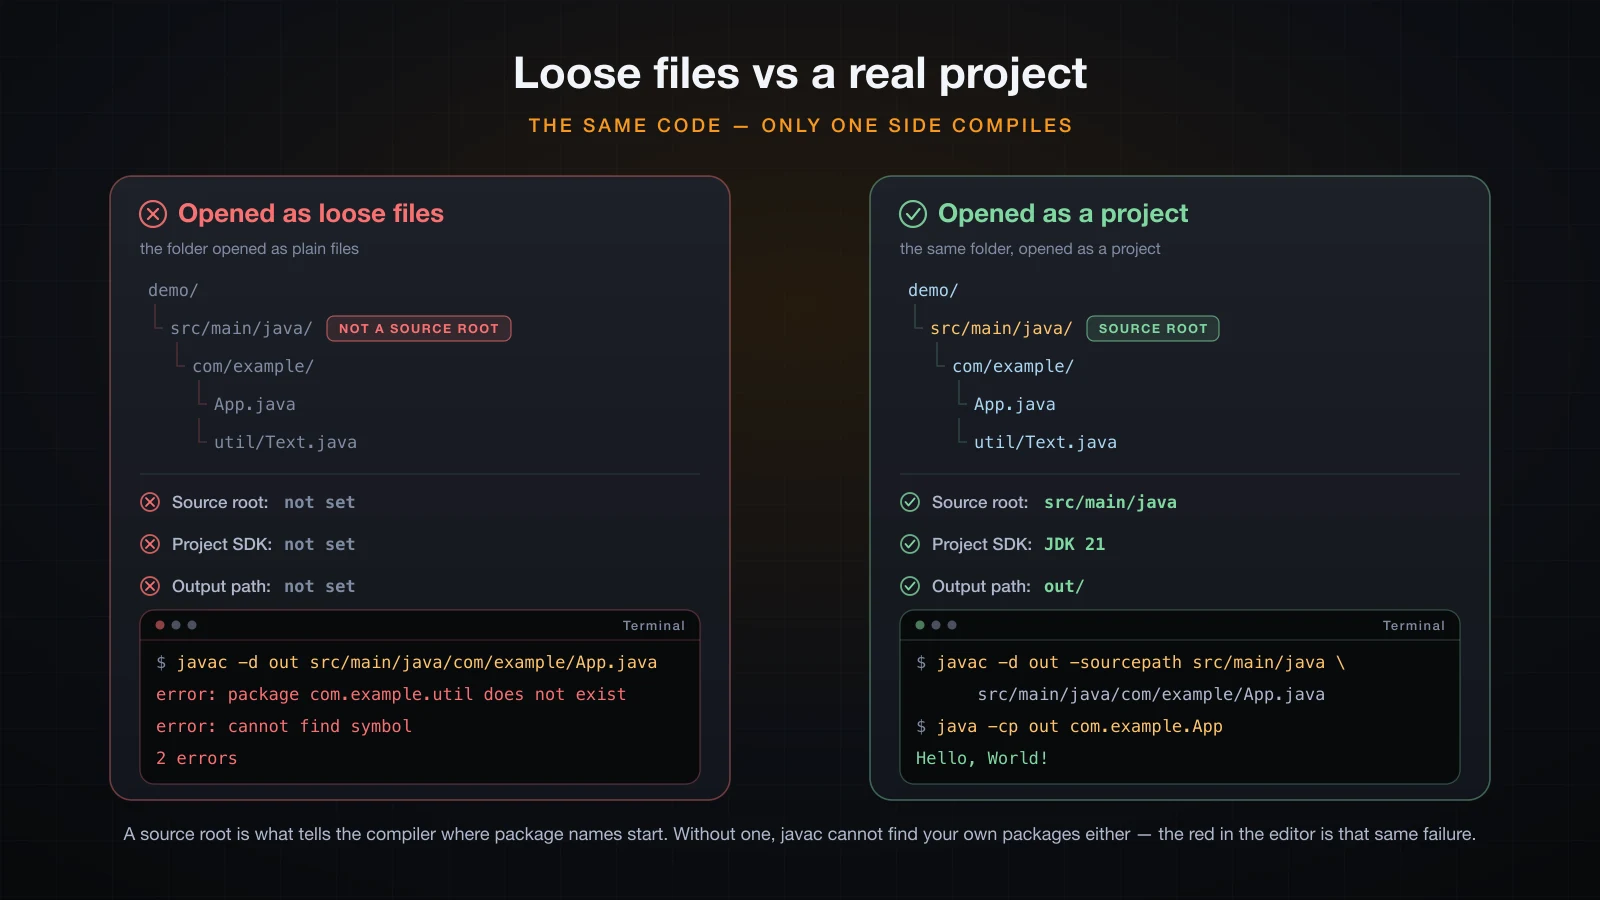
Everything red, Cannot resolve symbol 'String' | No project SDK. IntelliJ shows a red J on the module and a Project SDK is not defined banner | File → Project Structure → Project → SDK, pick a JDK. Set Language level to match. |
Cannot resolve symbol 'Greeter' for your own class | The file's package does not match its directory, or the file is outside the source root | Move the file so the path matches the package, or fix the package line. Mark the right folder as Sources Root via right-click → Mark Directory as. |
Error: Could not find or load main class App | Running against a classpath root that is not the package root | Point the classpath at the directory containing com/, not at com/example/. |
NoClassDefFoundError: App (wrong name: com/example/App) | Same mismatch, caught at class-load time — the .class file records its own package | As above. Recompile after moving the file, not before. |
error: class Greeter is public, should be declared in a file named Greeter.java | Public class name and file name differ | Rename the file, or rename the class with Shift+F6 so the IDE renames both. |
Error: Main method not found in class NoMain | The class has no public static void main(String[] args) | Add one, or run the class that has it. The full message is quoted below. |
| Red squiggles on correct code; stale completions; a class the IDE claims does not exist | The IDE's index is out of date, usually after a branch switch or an external file change | File → Invalidate Caches…, tick Clear file system cache and Local History, then Invalidate and Restart. |
The first two rows are the same underlying situation — a folder the IDE was never told how to treat:
The missing-main message names the exact signature it wanted, which is the fastest way to spot a typo such as String args instead of String[] args:
Error: Main method not found in class NoMain, please define the main method as:
   public static void main(String[] args)
or a JavaFX application class must extend javafx.application.Application
Reach for Invalidate Caches last, not first. It discards the index and forces a full re-scan, which on a large project takes minutes; a project-SDK or package-path problem is far more likely and takes seconds to check.
FAQ
Is IntelliJ IDEA Community enough, or do I need Ultimate? Community is enough for everything in this series and for plain Java work generally. Ultimate earns its price on Spring, Jakarta EE, JPA and database tooling — none of which you are writing yet. A free trial and free student and open-source licences exist if you want to look.
Do I still need a JDK if the IDE has a compiler?
Yes. IntelliJ and Eclipse ship their own incremental compilers for editor feedback, but they compile and run against a JDK you select, and VS Code shells out to javac entirely. No JDK, no project.
Why does my new class have red errors before I have written anything?
Almost always the project SDK is unset, or the file is not under a source root. Check Project Structure → Project → SDK first, then check that the folder holding your src is marked as Sources Root.
Can I open an existing Maven or Gradle project without a wizard?
Yes — File → Open and select the pom.xml or build.gradle. IntelliJ imports the dependencies, source roots and output directory from the build file. Doing this in a plain-Java project would create an unconfigured module instead.
Should out/, target/ and .idea/ go into Git?
No to out/ and target/ — they are generated. For .idea/, commit misc.xml, modules.xml, compiler.xml and the code style files if the team shares settings; always exclude workspace.xml and shelf/, which are per-user.
Is VS Code a bad choice for Java? No, just a different trade-off: it starts faster and uses less memory, but its refactoring catalogue is smaller and Java-specific tooling arrives as extensions you assemble. If you already live in VS Code, the Extension Pack for Java is a fine place to start.
Conclusion
You now have an IDE, a project, and a mental model of what the wizard created: a source root whose directory structure is the package structure, an output directory that mirrors it in .class files, and a run configuration that ties them together. Most first-week Java problems are one of the three you saw above — no project SDK, a package that does not match its path, or a classpath pointed at the wrong root — and each has a message that says exactly which.
The next article opens the file the wizard generated and reads it line by line: writing Hello World from scratch, and the anatomy of a .java file — what public, class, static and String[] args each mean, and why main has to look exactly like that.
![[Java Basics] Methods in Java: Declaring and Calling Them](/images/blog/methods-in-java-thumbnail.en.webp)
![[Java Basics] Nested Loops, break and continue in Java](/images/blog/nested-loops-thumbnail.en.webp)
![[Spring Boot Basics] Setting Up Spring Boot: JDK, IDE, Spring Initializr and Your First Application](/images/blog/sb-setup-thumbnail.en.webp)
![[Java Basics] Read and Write Text Files in Java](/images/blog/file-io-thumbnail.en.webp)