Welcome back! In the previous article, we got enough "building materials" (View, Text, Image...). But if you just drop them into the code, the interface will look incredibly messy, gray, and components will keep overlapping each other.
Like building a house, having bricks and mortar is not enough. You need an interior design blueprint to decide where the TV goes, what color the sofa is, and how the rooms are divided. In React Native, that "interior design" job is handled by StyleSheet and the Flexbox layout system.
This article will help you master the art of arranging interfaces precisely down to every pixel!
1. Goodbye traditional CSS, Hello StyleSheet
If you come from Web programming, you might be looking for .css files to write styles. Stop right there! React Native does not use pure CSS. Instead, all styles are written directly using JavaScript Objects.

"When in Rome, do as the Romans do" Rule
There are two biggest differences between Web CSS and Styling in React Native that you must keep in mind:
- Property names are written in camelCase: Instead of writing
background-color, you must writebackgroundColor. Instead offont-size, you writefontSize. - No
pxoremunits: All dimension numbers are unitless integers. The system will automatically convert them into density-independent pixels (dp/pt) to display consistently across all screen types.
How to use StyleSheet.create()
Although you can pass styles directly into the tag (called Inline Style), the most professional and performance-optimized way is to use StyleSheet.create().
import React from 'react'
import { View, Text, StyleSheet } from 'react-native'

export default function App() {
  return (
    <View style={styles.container}>
      <Text style={styles.title}>Standard React Native Style</Text>
    </View>
  )
}

const styles = StyleSheet.create({
  container: {
    backgroundColor: '#1e272e',
    padding: 20,
    borderRadius: 15,
  },
  title: {
    color: '#0fbcf9',
    fontSize: 24,
    fontWeight: 'bold',
  },
})
2. Flexbox: The art of precise formation
Knowing how to color and change fonts is one thing, but how do you place two buttons next to each other, or perfectly center an image on the screen? That's when Flexbox steps in.
Flexbox is an incredibly powerful layout algorithm. Imagine you are designing a strategy guide app for the game LoL, and you need to create a card displaying a super strong duo: Katarina (Mid lane) and Lee Sin (Jungle). You can't just randomly throw their avatars on the screen. Flexbox is the tactical sandbox that helps you position them accurately.
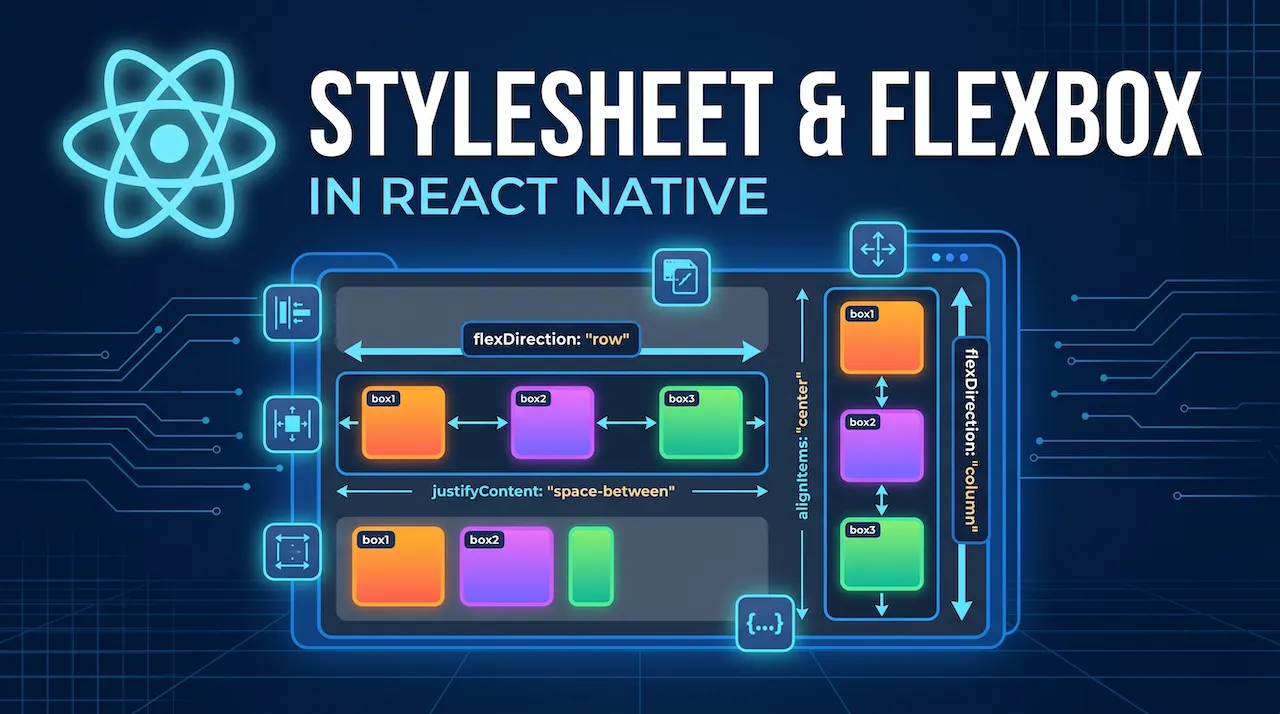
#1: flexDirection (Formation axis)
This property determines whether the child elements inside a <View> tag will be arranged horizontally or vertically.
column: (Default in React Native) Arranged from top to bottom.row: Arranged from left to right.
Major note: On the Web, Flexbox defaults to row. But on Mobile, because the phone screen is a vertical rectangle, React Native has set the default to column.
#2: justifyContent (Deploy troops on the main axis)
Once you have chosen the direction (flexDirection), justifyContent will help you distribute the spacing of the elements along that direction.
For example, if flexDirection is row (horizontal), justifyContent will arrange the avatars lying on that horizontal line.
Common values:
flex-start: Push everything to the beginning.center: Center perfectly.space-between: Push the two elements close to the two edges of the screen, with empty space in the middle.space-around: Evenly distribute the empty space around the elements.
#3: alignItems (Deploy troops on the cross axis)
If justifyContent handles the main axis, alignItems takes care of the axis perpendicular to it.
For example, if you are arranging a horizontal row (row), alignItems will help you decide whether the avatars should stick to the top, drop to the bottom, or be centered vertically within that row.
3. Practice: Building a "strategy card" with Flexbox
To clearly understand how the above properties work together, let's write code for an interface displaying the Katarina and Lee Sin duo. The goal is a bordered card containing 2 avatars next to each other, evenly spaced, and vertically centered.
import React from 'react'
import { View, Text, Image, StyleSheet } from 'react-native'

export default function SynergyCard() {
  return (
    // The outermost box takes up the whole screen and centers the card
    <View style={styles.screen}>
      {/* This is our Strategy Card */}
      <View style={styles.card}>
        {/* Katarina's block */}
        <View style={styles.championBox}>
          <Image source={{ uri: 'https://link-to-katarina-avatar.png' }} style={styles.avatar} />
          <Text style={styles.name}>Katarina</Text>
          <Text style={styles.role}>Mid Lane</Text>
        </View>

        {/* Synergy icon block in the middle */}
        <Text style={styles.vsText}>🤝</Text>

        {/* Lee Sin's block */}
        <View style={styles.championBox}>
          <Image source={{ uri: 'https://link-to-leesin-avatar.png' }} style={styles.avatar} />
          <Text style={styles.name}>Lee Sin</Text>
          <Text style={styles.role}>Jungle</Text>
        </View>
      </View>
    </View>
  )
}

const styles = StyleSheet.create({
  screen: {
    flex: 1, // Take up the entire screen space
    justifyContent: 'center', // Center vertically (because default flexDirection is column)
    alignItems: 'center', // Center horizontally
    backgroundColor: '#111',
  },
  card: {
    flexDirection: 'row', // IMPORTANT: Arrange horizontally
    justifyContent: 'space-around', // Evenly divide the space between the 2 champions and the icon
    alignItems: 'center', // Center them vertically within the card
    backgroundColor: '#2d3436',
    width: '90%',
    padding: 20,
    borderRadius: 15,
    borderWidth: 2,
    borderColor: '#c8d6e5',
  },
  championBox: {
    alignItems: 'center', // Center the image and text of each champion
  },
  avatar: {
    width: 80,
    height: 80,
    borderRadius: 40,
    borderWidth: 2,
    borderColor: '#fdcb6e',
  },
  name: {
    color: '#fff',
    fontWeight: 'bold',
    marginTop: 10,
    fontSize: 16,
  },
  role: {
    color: '#b2bec3',
    fontSize: 12,
  },
  vsText: {
    fontSize: 24,
  },
})
With just a few lines of Flexbox, everything automatically falls into the right place neatly, regardless of whether the phone screen is large or small.
Conclusion: Building beautiful interfaces is not hard at all
Remember the "mantra" when creating React Native interfaces:
- Always use
StyleSheet.create(). - Do not use
px, write properties incamelCase. - Flexbox is the only tool you need to layout everything. Determine the Main axis (
flexDirection) first, then adjust spacing on the main axis withjustifyContent, and the cross axis withalignItems.
Now your application is visually appealing and structurally sound. However, it still cannot respond when the user interacts. In the next article, we will learn how to turn these static interface cards into lively buttons that know how to listen to every user's touch!