Congratulations on making it to the final steps of your journey!
All this time, you have been running your application through Expo Go or Development Build. But you can't tell your users: "Please download Expo Go and scan my QR code to use the app".
For users to be able to download the app from Google Play, Apple App Store, or simply send the installation file via Zalo for friends to try, you must perform the App Building (Packaging) process. This process will compile all JavaScript code, images, fonts, and native cores into a single file: APK/AAB (for Android) and IPA (for iOS).
In this lesson, we will leverage the power of EAS Build to make packaging easier than ever, even if your computer is weak or you don't even have a Mac!
1. EAS Build: The Developer's "Magic Cloud"
Previously, to build a React Native app, you ABSOLUTELY had to have a powerful computer with Android Studio installed (to build Android) and a Macbook with Xcode installed (to build iOS). Configuring the local build environment often generated a ton of extremely frustrating "red" errors.
EAS Build (Expo Application Services) was born to eliminate that pain.

It is a cloud server service. You just need to type one command line, and all your code will be compressed and sent to Expo's supercomputer. This supercomputer will automatically run Android Studio/Xcode, build the installation file, and send you the download link.
Thanks to EAS Build, you can code on a Windows computer and build an iOS application file (IPA) without having to spend money to buy a Macbook!
2. Configuration Preparation: eas.json
For EAS Build to know whether you want to package the application for internal testing or to publish it to the Store, we use the eas.json file (automatically created when you ran the eas init command in previous lessons).
Open the eas.json file and set up the 2 most basic environments (profiles) as follows:
{
  "build": {
    "preview": {
      "android": {
        "buildType": "apk"
      },
      "ios": {
        "simulator": true
      }
    },
    "production": {}
  }
}
previewProfile: For internal testing. Builds an.apkfile so friends can install it directly on their Android devices, and builds a file to run on the iOS simulator.productionProfile: For the Store. It will build to the highest standards for submission to Google and Apple.
3. Packaging for Android: The Difference Between APK and AAB
The Android world has 2 installation file formats that you must clearly distinguish:
- APK (Android Package Kit): This is a direct installation file. You can copy this file to a memory card, send it via Google Drive, Zalo, and click install on any Android device.
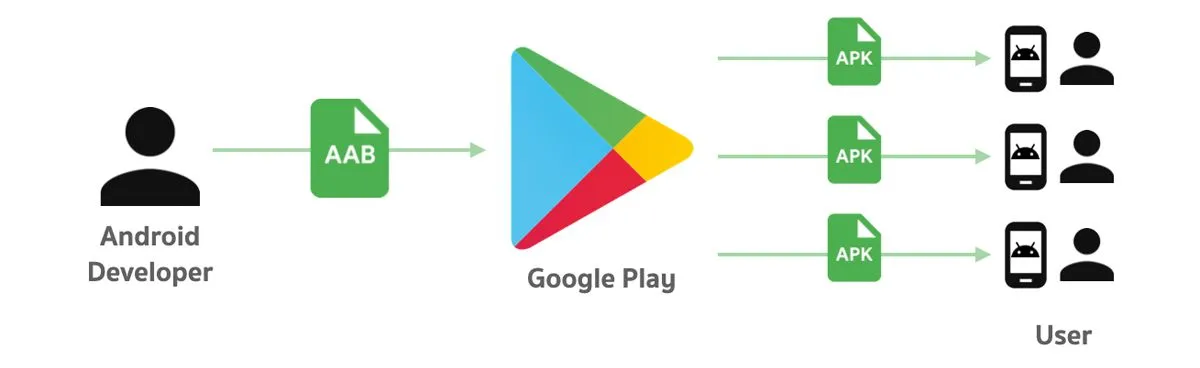
- AAB (Android App Bundle): This is the mandatory standard today if you want to put your app on the Google Play Store. AAB cannot be installed directly on a phone. It's like a "spare parts warehouse". When a user clicks "Download" on Google Play, Google will automatically pick the appropriate spare parts for that person's device configuration to assemble into the most optimized APK file, making the app much lighter.
Practice Building an APK File (To send to friends for testing)
Open the Terminal and run the command:
eas build --platform android --profile preview
Practice Building an AAB File (To upload to Google Play)
Open the Terminal and run the command:
eas build --platform android --profile production
The Keystore Secret: For Android to know who the true owner of this AAB/APK file is (preventing hackers from spoofing your app), the application must be signed with a "digital certificate" called an Android Keystore. Amazingly, when running the EAS Build command for the first time, Expo will ask: "Would you like us to automatically create and manage a Keystore for you?". You just type Y (Yes) and EAS will take care of all the security for you!
4. Packaging for iOS: Overcoming Apple's "Gate"
Building an iOS application (.IPA file) is much more complex than Android due to Apple's closed security policy.
Prerequisite: You MUST purchase an Apple Developer account (Price $99/year). If you do not have this account, you will not be able to create an IPA file to install on a real iPhone.
If you already have an account, run the following command:
eas build --platform ios --profile production
Certificates & Provisioning Profiles
If doing it the traditional way with Xcode, you would have to go to Apple's website, manually create a Certificate, download the Provisioning Profile, link devices (Device IDs)... extremely complex and easy to expire.
With EAS Build, when you run the command above, the system will ask you to log in to your Apple ID account on the Terminal. After that, EAS will automatically communicate with Apple's servers, automatically create certificates, and automatically sign your app! Your job is just to sip a cup of coffee and wait for the .ipa file to come out of the oven.
5. Download & Experience the Results
After the build command finishes running (about 10-15 minutes depending on the size of the project), your Terminal will display a link and a QR code.
- For Android (APK): You just need to use your Android phone to scan the QR code, download the
.apkfile, and click "Install". Don't forget to turn on the "Allow installation of apps from unknown sources" option in your phone's Settings! - For iOS / Android AAB: You click on the link to download the
.ipaor.aabfile to your computer, preparing for the step to submit to the Store.
Conclusion: Building apps is no longer complicated
The application packaging process is now encapsulated in 2 words: EAS Build.
- The
eas build -p android --profile previewcommand produces an instantly installable APK file. - The
eas build -p androidcommand produces a Google Play standard AAB file. - The
eas build -p ioscommand produces an App Store standard IPA file without needing a Macbook. - The system automatically manages all complex Keystores and Certificates.
Holding your own installation file in your hand, are you ready to share your work with the whole world? Let's prepare profiles, images, and metadata to advance to Lesson 27: Publishing Your Application to the Store – Conquering Google Play & Apple App Store (TestFlight)!