
In previous articles, we learned how to call APIs using fetch combined with useEffect and useState. Then, we learned how to use Redux/Zustand to manage data across the entire application. Many developers think: "Ah, so I will call the API, then take the data and stuff it into Redux for shared use!"
But the truth is: That is an architectural mistake that makes your application sluggish and full of junk code (boilerplate)!
Why is that? And how can top-tier applications scroll lists smoothly and intelligently cache data even when the network is unstable? Welcome to the era of React Query (now renamed to TanStack Query).
1. The vital difference: Client State vs Server State
To understand why Redux or Zustand is "powerless" against APIs, you need to distinguish between 2 types of State in your application:
- Client State: Is data entirely controlled by the phone user. For example: Which tab the user is on, which modal is open, how many items are in the cart. This data is synchronous, fast, and never delayed. ➡️ This is the playground of Zustand / Redux.
- Server State: Is data you borrow from a database in the cloud. For example: A list of champion guides, post comments, match information. This data is asynchronous, has latency (depends on the network), and can be changed by others at any time (out of date). ➡️ Stuffing this data into Redux is extremely tedious.
If you use useEffect and Redux to handle Server State, for each API, you will have to manually write logic for 3 variables: data, isLoading, isError. If you have 50 different APIs, you will drown in a sea of repetitive code.
React Query was born to "kill" that mess.
2. React Query: Rescuing the app from useEffect
Let's see how React Query simplifies fetching a complex list of champion guides (like Ahri, Akali, or Aatrox) with just a single Hook called useQuery.
Step 1: Install the library
npm install @tanstack/react-query
Step 2: Wrap the application in a Provider
In the app/_layout.tsx or App.js file:
import { QueryClient, QueryClientProvider } from '@tanstack/react-query'

// Initialize an API management station
const queryClient = new QueryClient()

export default function RootLayout() {
  return <QueryClientProvider client={queryClient}>{/* Your Expo Router screens go here */}</QueryClientProvider>
}
Step 3: Use useQuery instead of useEffect
Watch the magic happen (on the List screen). The entire logic of declaring State, calling functions, catching errors, turning Loading on and off is now shrunk to just this much code:
import { View, Text, FlatList, ActivityIndicator } from 'react-native'
import { useQuery } from '@tanstack/react-query'

// Pure API fetch function (Has nothing to do with UI)
const fetchChampions = async () => {
  const response = await fetch('https://api.example.com/champions')
  if (!response.ok) throw new Error('Network error!')
  return response.json()
}

export default function ChampionList() {
  // The power of React Query: Automatically manages all states
  const { data, isLoading, isError, error } = useQuery({
    queryKey: ['champions'], // Identifier name for this API (like a name tag)
    queryFn: fetchChampions, // The function that will be executed
  })

  if (isLoading) return <ActivityIndicator size="large" />
  if (isError) return <Text>An error occurred: {error.message}</Text>

  return (
    <FlatList
      data={data}
      keyExtractor={(item) => item.id}
      renderItem={({ item }) => (
        <Text>
          {item.name} - {item.role}
        </Text>
      )}
    />
  )
}
No need for useState! No need for useEffect! You just declare what you want, React Query will do everything in the background.
3. Caching & Stale-While-Revalidate
The most "valuable" feature of React Query is not writing shorter code, but its automatic Cache mechanism.
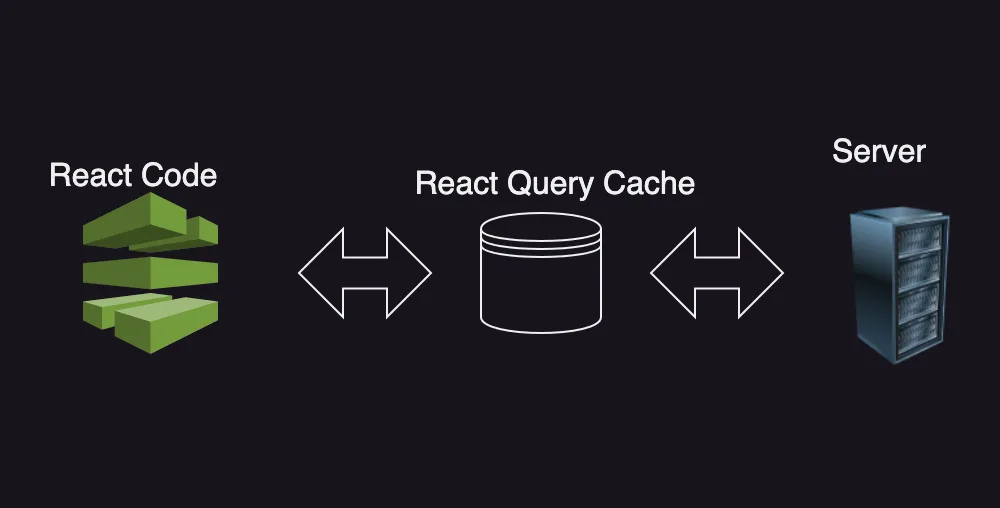
When you use useQuery to fetch a list of champions (with queryKey as ['champions']), it will automatically save that data array into the phone's cache memory (Cache).
The perfect scenario:
- The first time you open the app, you have to wait 1 second to see the list.
- You click to view Akali's Details page.
- You press "Back" to the List page.
- Result: The list appears INSTANTLY without even 1 millisecond of delay!
React Query uses the Stale-while-revalidate strategy: It will instantly pull old data from the Cache for you to preview for a smooth experience, while secretly dispatching a request running in the background to the Server. If there is a newly released champion on the Server, it will automatically replace the UI with new data without lagging the app!
4. useMutation: Sending data to the Server
If useQuery was born to read data (GET), then useMutation is your weapon to Write, Edit, and Delete data (POST, PUT, DELETE).
For example: You want to mark a guide as "Favorite".
import { useMutation, useQueryClient } from '@tanstack/react-query'
import { TouchableOpacity, Text, Alert } from 'react-native'

const addToFavorites = async (championId) => {
  const response = await fetch('https://api.example.com/favorites', {
    method: 'POST',
    body: JSON.stringify({ id: championId }),
  })
  return response.json()
}

export default function FavoriteButton({ championId }) {
  const queryClient = useQueryClient()

  // Declare Mutation
  const mutation = useMutation({
    mutationFn: addToFavorites,
    onSuccess: () => {
      Alert.alert('Success!', 'Added to favorite list.')
      // Important: Command the favorite list API to re-run to update the UI
      queryClient.invalidateQueries({ queryKey: ['favoriteList'] })
    },
  })

  return (
    <TouchableOpacity
      onPress={() => mutation.mutate(championId)}
      disabled={mutation.isPending} // Disable the button while sending API
    >
      <Text>{mutation.isPending ? 'Saving...' : '❤️ Favorite'}</Text>
    </TouchableOpacity>
  )
}
Conclusion: Harmonious combination of Client State and Server State is needed
The combination of Zustand (Client State Management) and React Query (Server State Management) is currently the unbeatable "Tech Stack" in React Native. It eliminates thousands of lines of redundant code, helping you focus 100% on making excellent features.
At this point, your application is truly a complete product in terms of data connection. You know how to call APIs, display lists, store offline, and optimize caching. However, a real Mobile app cannot just have screens and text! To compete on the App Store, your application must know how to utilize the phone's hardware.
Fasten your seatbelt and get ready to proceed to the exciting lessons ahead!