
In the previous post, we discovered the "magic" of Expo Router: Just by creating a file in the app/ folder, we immediately get a Route.
But currently, our screens are like locked rooms with no connecting doors. How can a user on the Home page (character list) click on an item and the screen smoothly slides to the Detail page? And more importantly, how does the Detail page know which character the user just clicked to display the correct information?
Today, we will open those doors with Stack Navigation, along with two essential survival skills: Navigating between screens and Passing parameters.
1. What is Stack Navigation? Understanding the "Stack"
In the Mobile world, the most popular way to switch from one screen to another is called Stack Navigation.
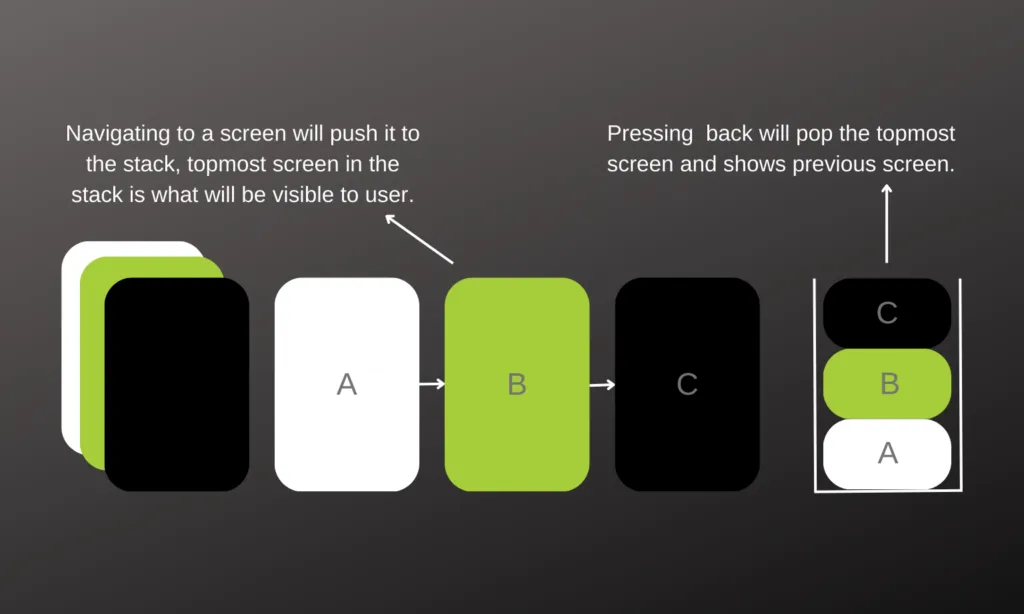
Imagine your screens as a deck of cards:
- When you open the app, you see the first card (Home Screen).
- When you click an item to see details, the application takes a new card (Detail Screen) and places it on top of the Home Screen card. This action is called Push.
- When you press the "Back" button at the left corner of the screen, the application discards the top card, revealing the Home Screen card waiting underneath. This action is called Pop.
Thanks to this mechanism, the application always remembers the "history" of the pages you've visited so it can accurately go back.
2. Ways to Navigate in Expo Router
With Expo Router, "Pushing" a new screen onto the stack is surprisingly easy. There are 2 main tools to do this: the <Link> Component and the useRouter Hook.
Method 1: Using the Link Component (For Static UIs)
If you have experience in Web development, <Link> works exactly like an <a> tag. It's used to wrap a piece of Text or a simple button.
Suppose you have the file structure:
app/index.tsx(Home Screen)app/profile.tsx(Profile Screen)
To go from the Home Screen to the Profile Screen, you write the following code in index.tsx:
import { View, Text, StyleSheet } from 'react-native'
import { Link } from 'expo-router' // 1. Import Link

export default function HomeScreen() {
  return (
    <View style={styles.container}>
      <Text>This is Home Screen</Text>

      {/* 2. Use Link and pass the route to the href property */}
      <Link href="/profile" style={styles.button}>
        Go to Profile
      </Link>
    </View>
  )
}

const styles = StyleSheet.create({
  container: { flex: 1, justifyContent: 'center', alignItems: 'center' },
  button: { marginTop: 20, color: 'blue', fontSize: 18, fontWeight: 'bold' },
})
Method 2: Using the useRouter Hook (For Logic Processing)
The <Link> component is great, but sometimes you don't want to navigate immediately. For example: When a user clicks "Login", you have to call an API to check the password, if correct, then navigate. In this case, you need the useRouter Hook.
import { View, Text, TouchableOpacity } from 'react-native'
import { useRouter } from 'expo-router' // 1. Import useRouter

export default function LoginScreen() {
  const router = useRouter() // 2. Initialize router

  const handleLogin = () => {
    console.log('Checking password...')
    // Assuming login is successful

    // 3. Use router.push() to navigate
    router.push('/home')
  }

  return (
    <View style={{ flex: 1, justifyContent: 'center', alignItems: 'center' }}>
      <TouchableOpacity onPress={handleLogin} style={{ backgroundColor: 'green', padding: 15 }}>
        <Text style={{ color: 'white' }}>Login</Text>
      </TouchableOpacity>
    </View>
  )
}
Quick Tip: If you want to go back to the previous page programmatically, simply call the router.back() function.
3. Passing and Receiving Parameters (Params)
This is the most important part of the article. Just navigating isn't enough, you must carry data with you!
Back to the example: From the Character List screen, you click on "Katarina". The Detail page that opens must show the name "Katarina", not "Lee Sin". We achieve this by passing parameters (Params).
Step 1: Sending Parameters
Instead of just passing a simple route string to href or router.push, we will pass an Object containing pathname (route) and params (carried data).
// Sending from the List screen (app/index.tsx)
import { useRouter } from 'expo-router'
import { TouchableOpacity, Text } from 'react-native'

export default function ListScreen() {
  const router = useRouter()

  const goToDetails = () => {
    // Navigate to details page and carry id, name, role
    router.push({
      pathname: '/details',
      params: { id: 1, name: 'Katarina', role: 'Assassin' },
    })
  }

  return (
    <TouchableOpacity onPress={goToDetails}>
      <Text>View Katarina's details</Text>
    </TouchableOpacity>
  )
}
Step 2: Receiving Parameters at Destination
To "catch" the data that was just sent, Expo Router provides us with an extremely powerful Hook called useLocalSearchParams.
// Receiving data at Detail screen (app/details.tsx)
import { View, Text, StyleSheet } from 'react-native'
import { useLocalSearchParams } from 'expo-router' // 1. Import Hook

export default function DetailsScreen() {
  // 2. Extract sent parameters
  const { id, name, role } = useLocalSearchParams()

  return (
    <View style={styles.container}>
      <Text style={styles.title}>Character Profile: {id}</Text>
      <Text style={styles.info}>Name: {name}</Text>
      <Text style={styles.info}>Role: {role}</Text>
    </View>
  )
}

const styles = StyleSheet.create({
  container: { flex: 1, justifyContent: 'center', alignItems: 'center' },
  title: { fontSize: 24, fontWeight: 'bold', color: 'red' },
  info: { fontSize: 20, marginTop: 10 },
})
Note: All parameters received via useLocalSearchParams() are in string format. If you pass the number 1, when you receive it, it will be the string "1".
4. Advanced Technique: Dynamic Routes
In previous lessons, we mentioned files with square brackets [id].tsx. Let's combine it with the parameter passing skill above!

Instead of creating a static file details.tsx, if you name your file app/details/[id].tsx, your directory will match any route like /details/1, /details/2,...
Now, you can pass the ID directly in the path like in web development:
// Go to character page with ID 99
<Link href="/details/99">View character 99</Link>
In the file app/details/[id].tsx, when you call const { id } = useLocalSearchParams(), the id variable will automatically receive the value 99. This is the standard practice for building product detail pages or blog posts!
Conclusion: Mastering Stack Navigation
Remember the 3 core tools from today's lesson:
- Use
<Link>to navigate for static buttons. - Use
useRouter()when you need to navigate after a calculation or API call. - Use
useLocalSearchParams()at the destination page to retrieve sent data (params).
Up to this point, you have fully mastered navigating between pages using a forward-backward "Stack". However, most modern applications (like Facebook, Shopee, Tiktok) feature a Tab Menu at the bottom of the screen to quickly switch between core features.
How do you create that "powerful" Menu bar? The answer will be in the next article. Stay tuned!